")


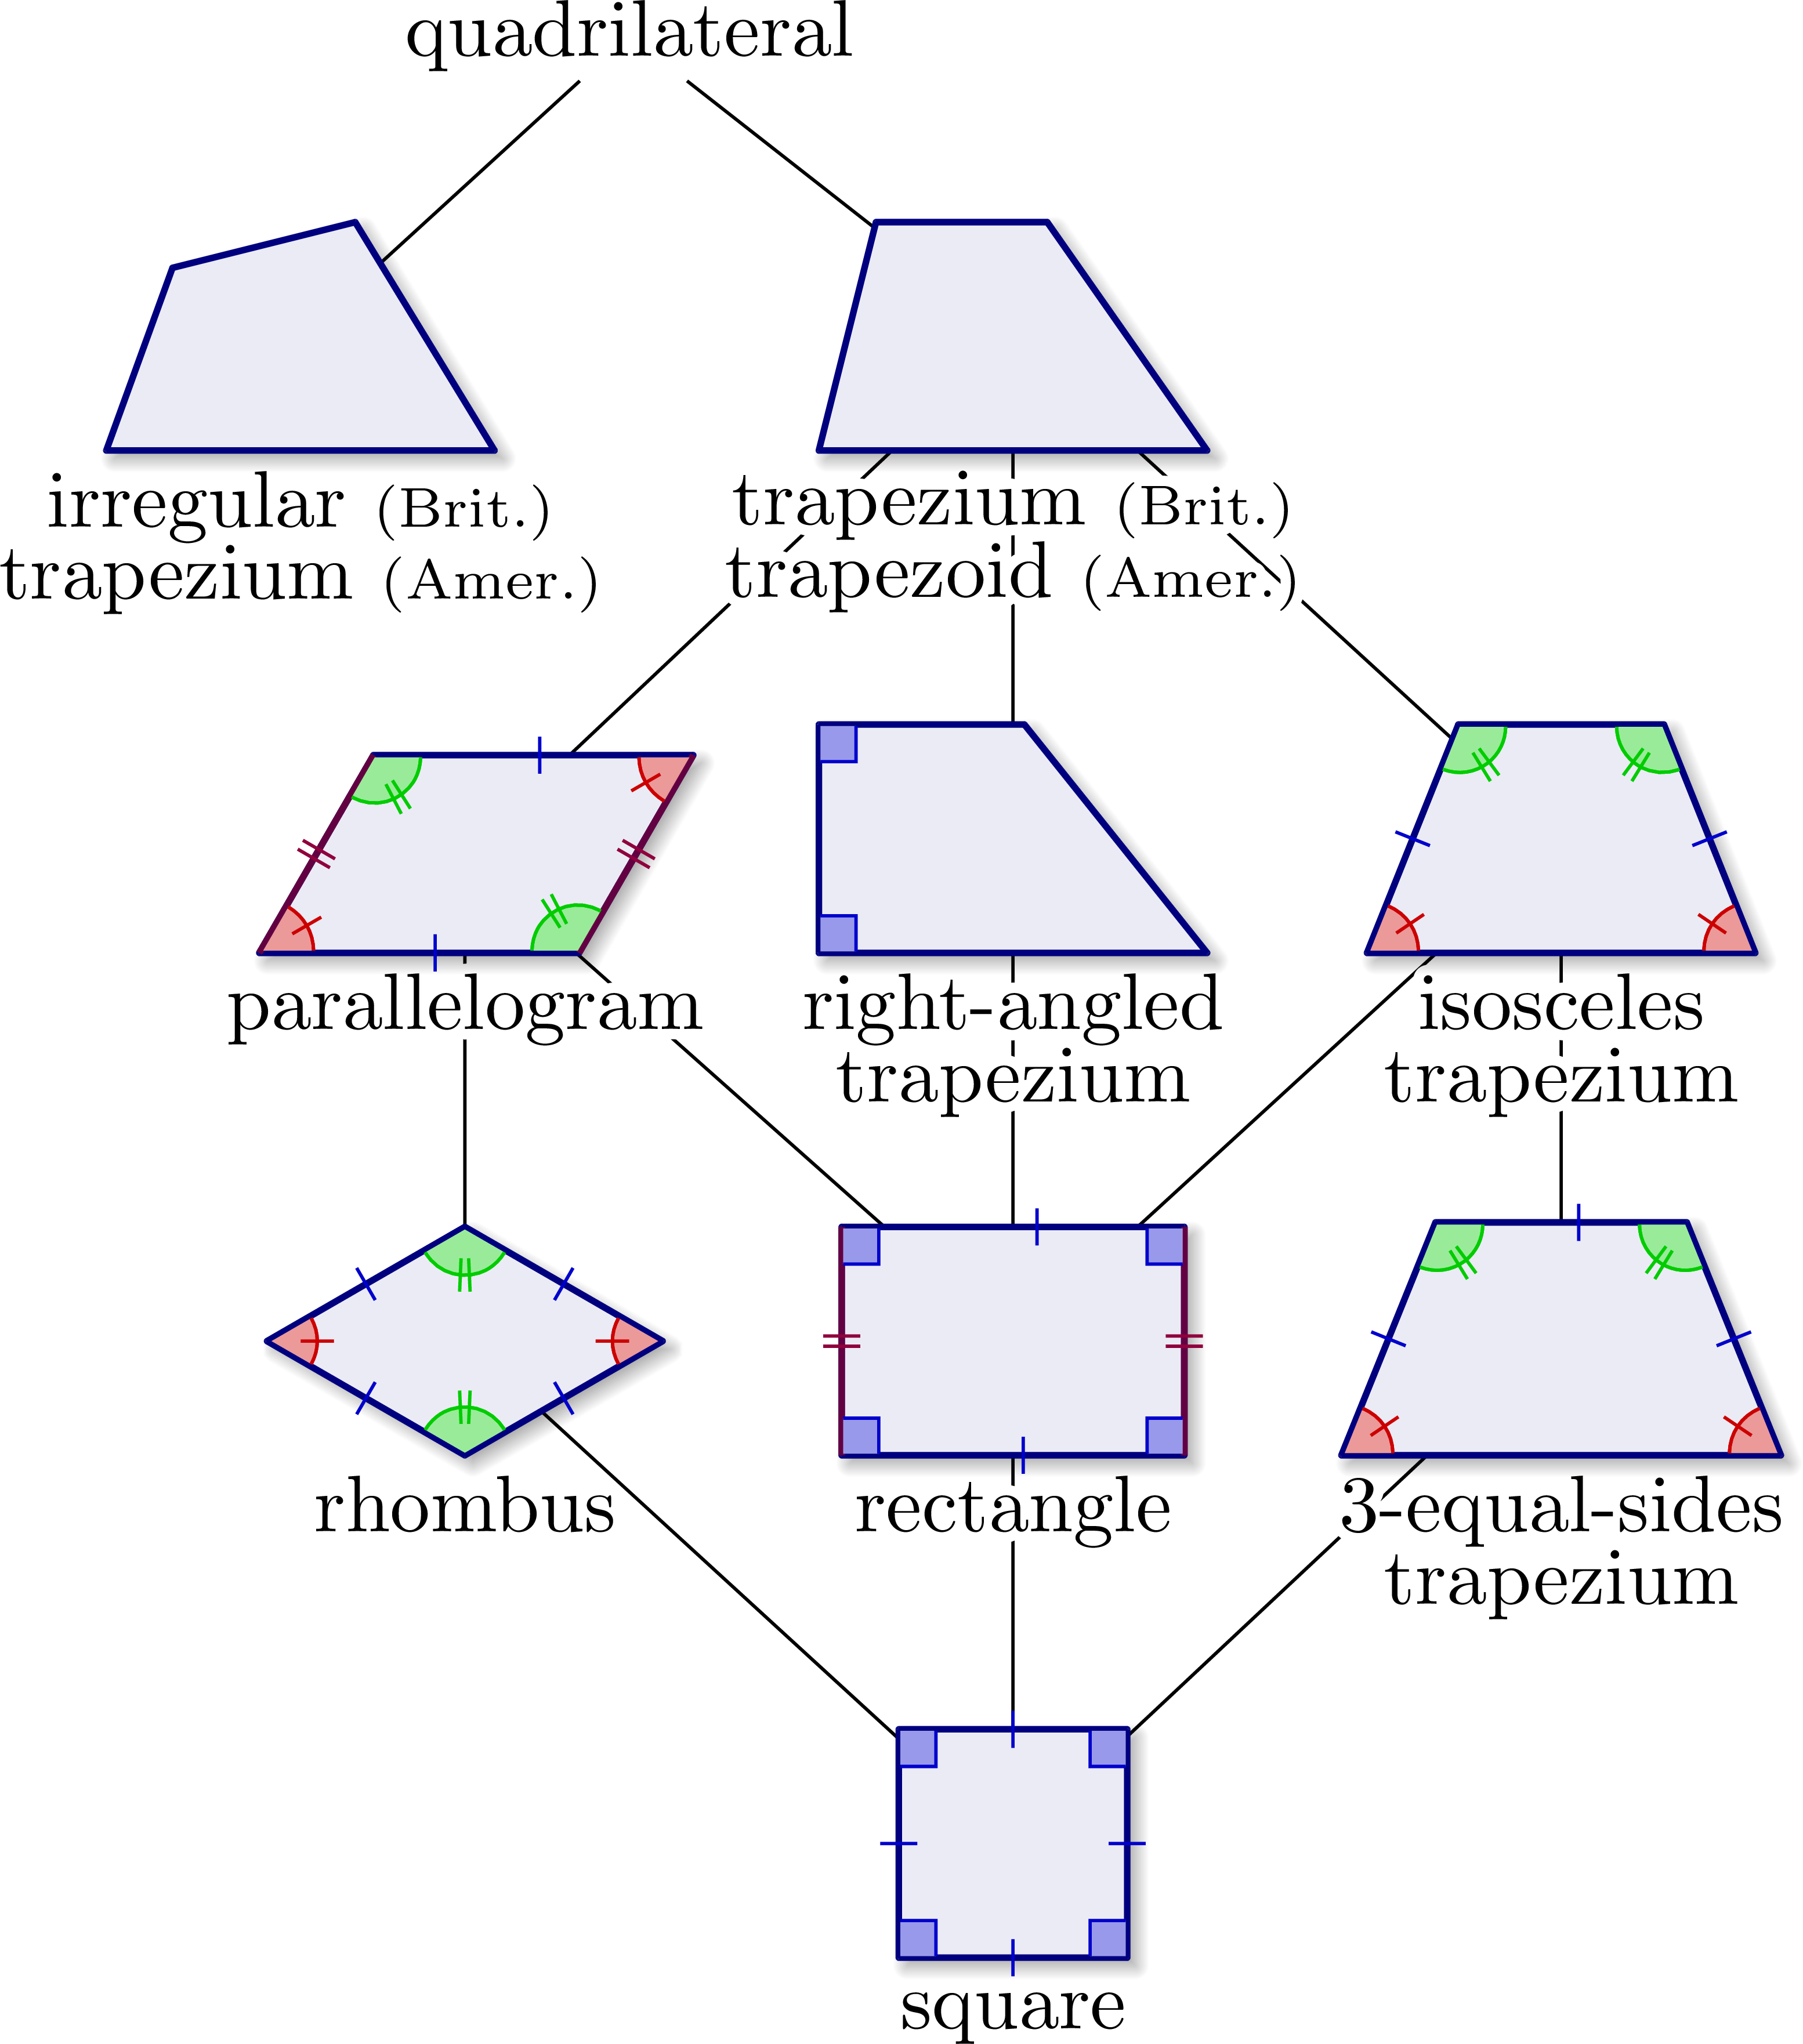
Hasse diagrams illustrating how quadrilaterals are related, and marking congruent and right angles, as well as same length sides with a custom macro via pic. Inspired by this image on Wikimedia Commons.
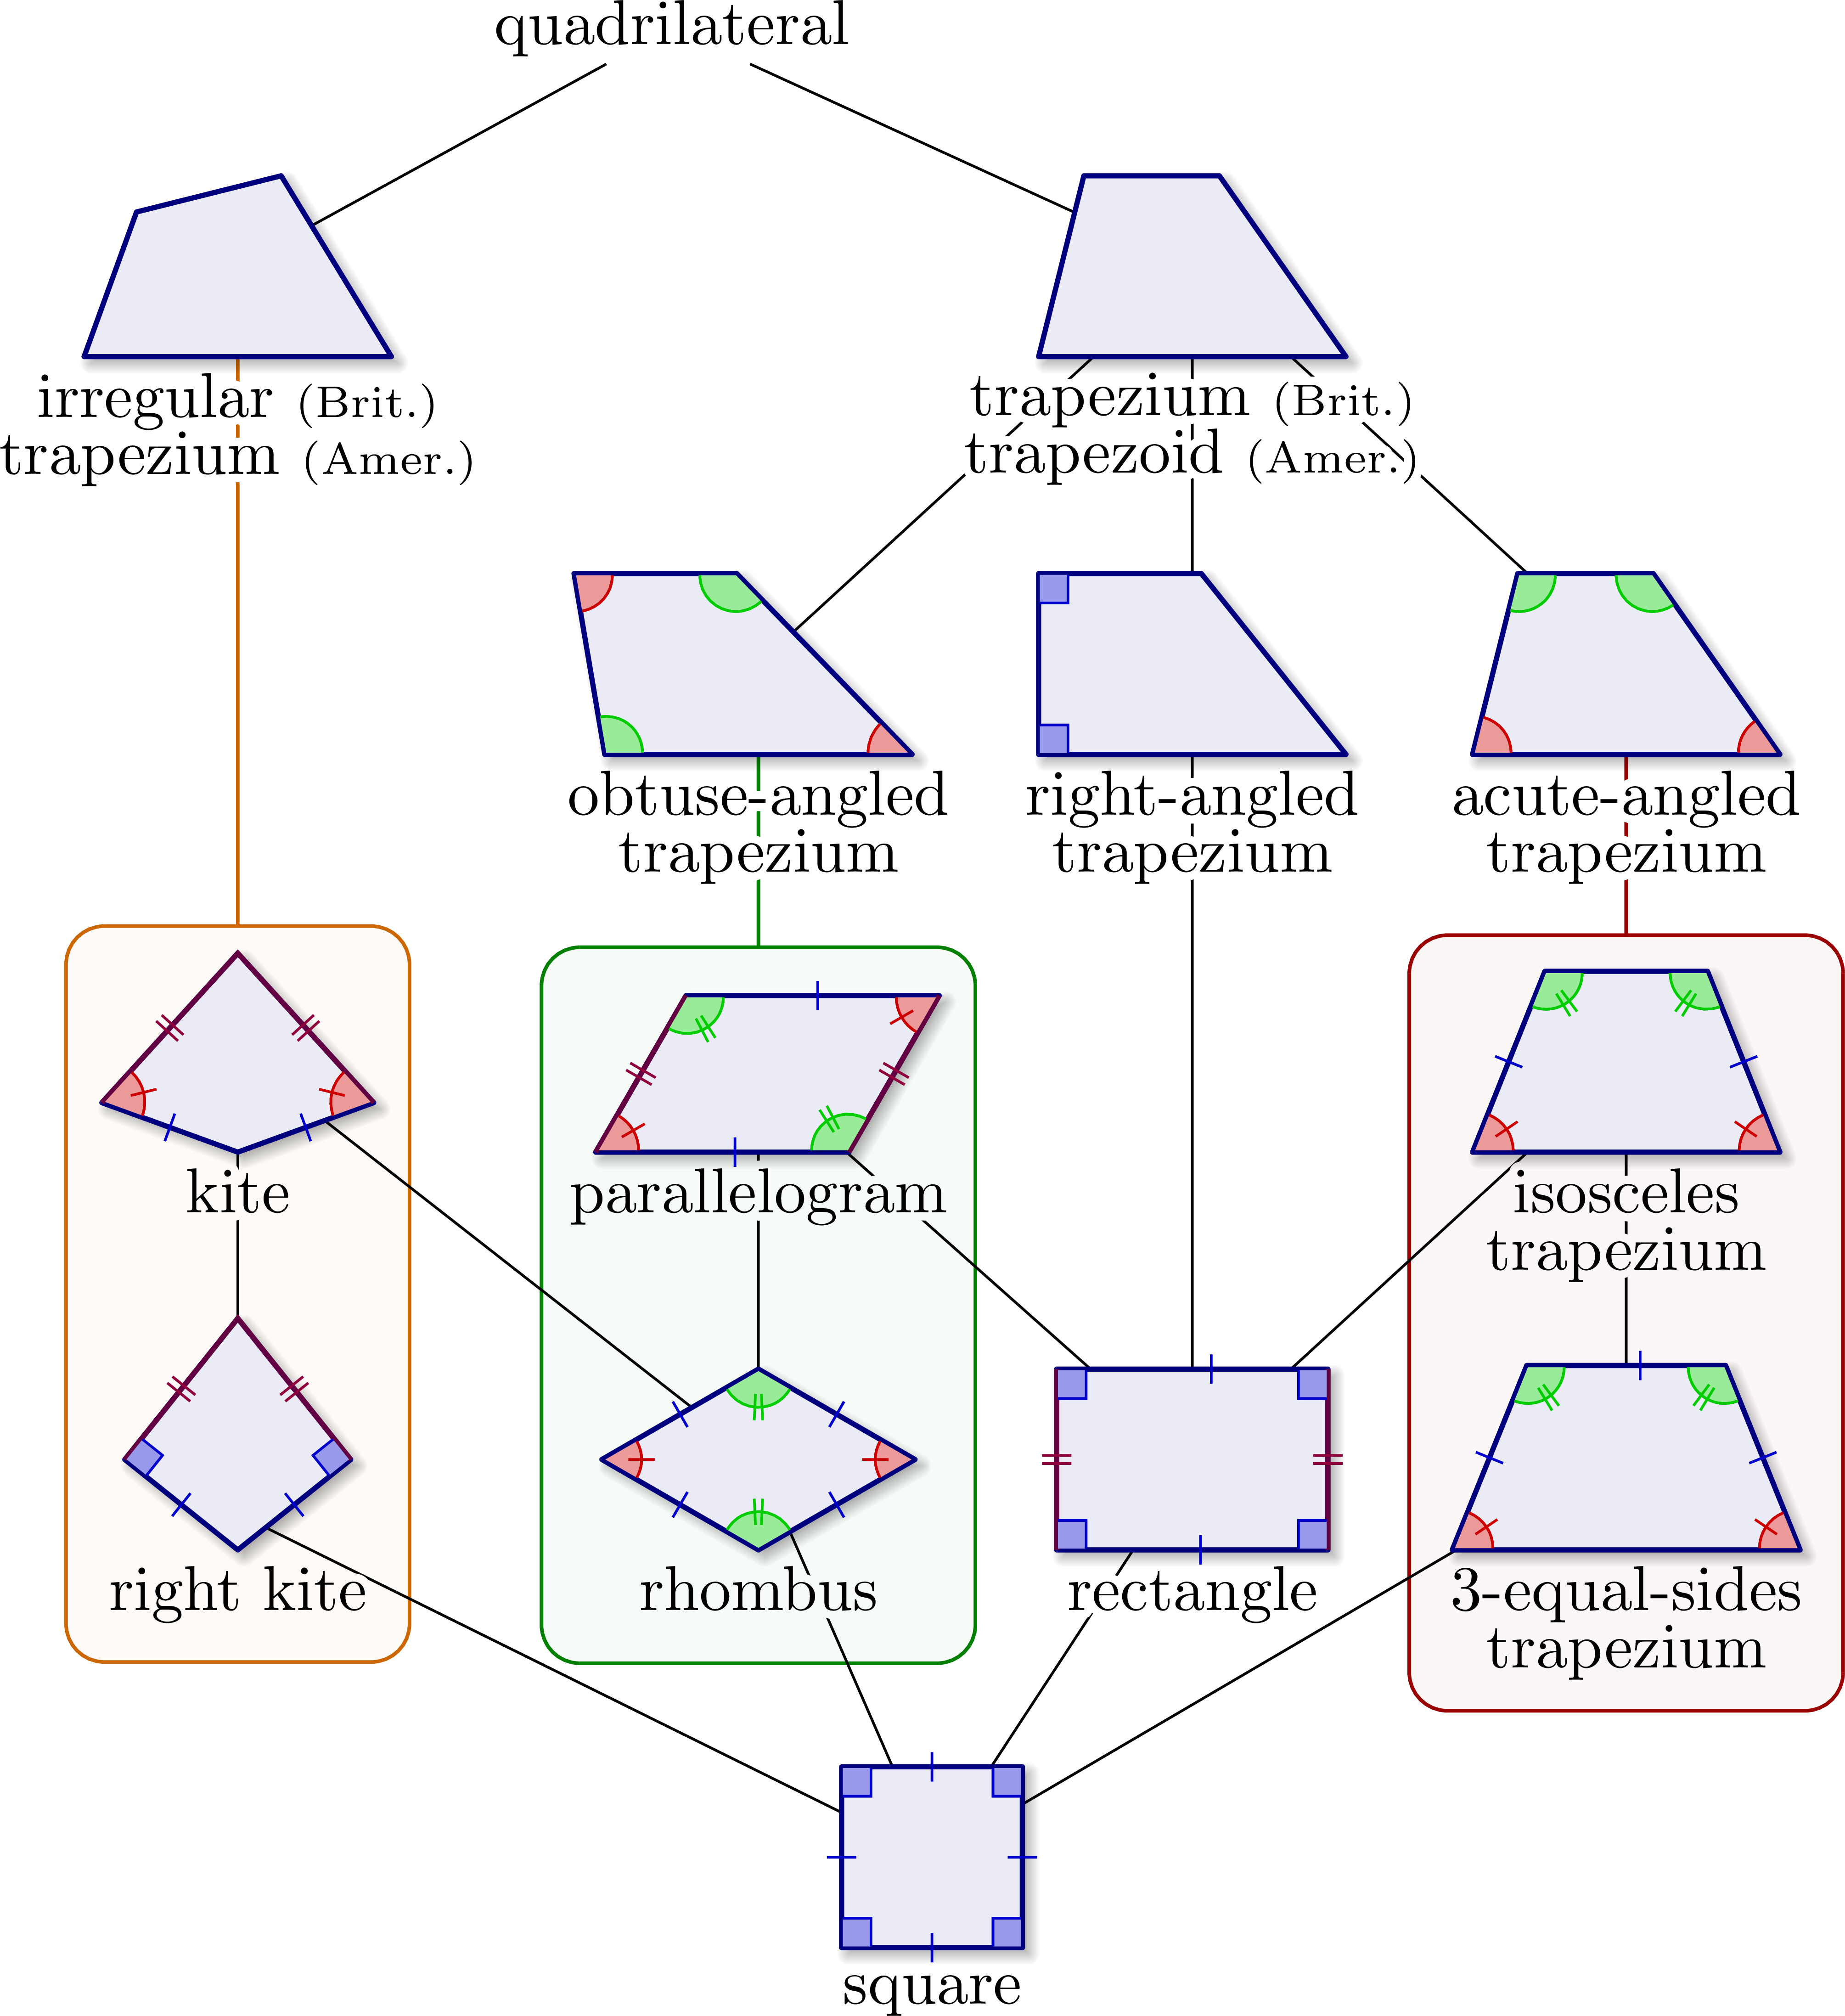
Most basic diagram to relate squares, rectangles, rhombi, trapezia / trapezoids using inclusive definitions:
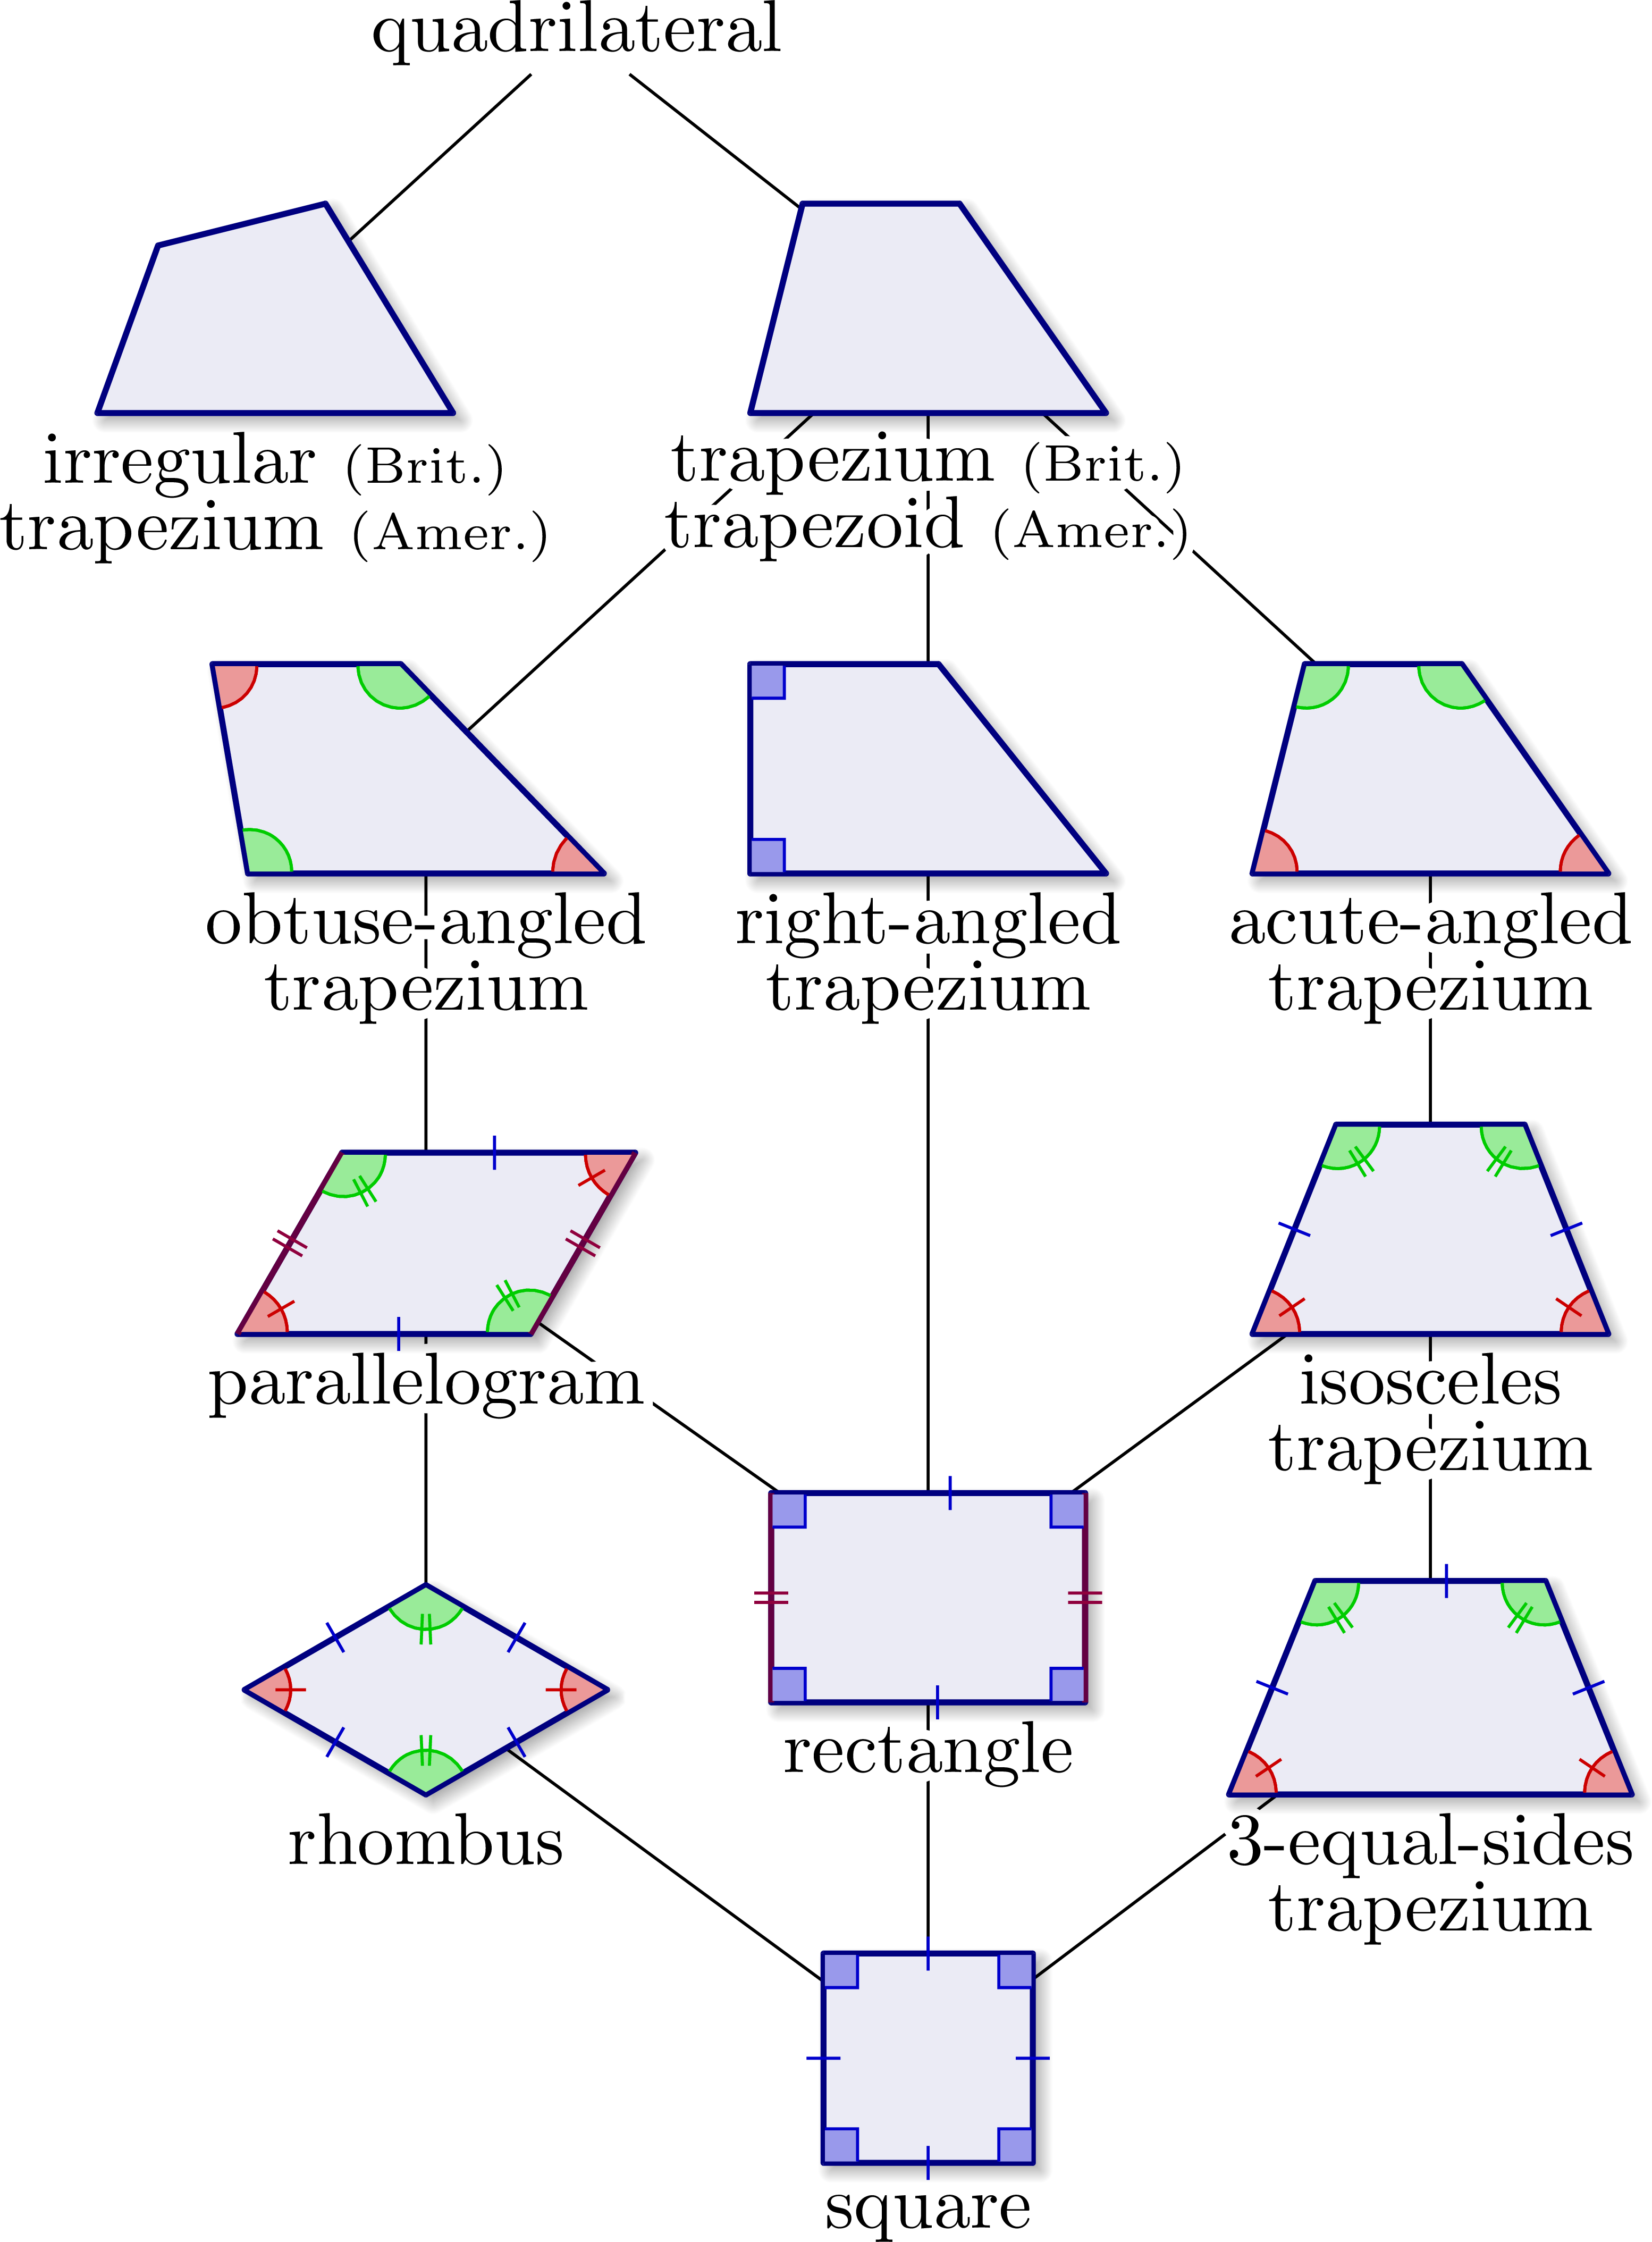
Including obtuse or acute trapezia:
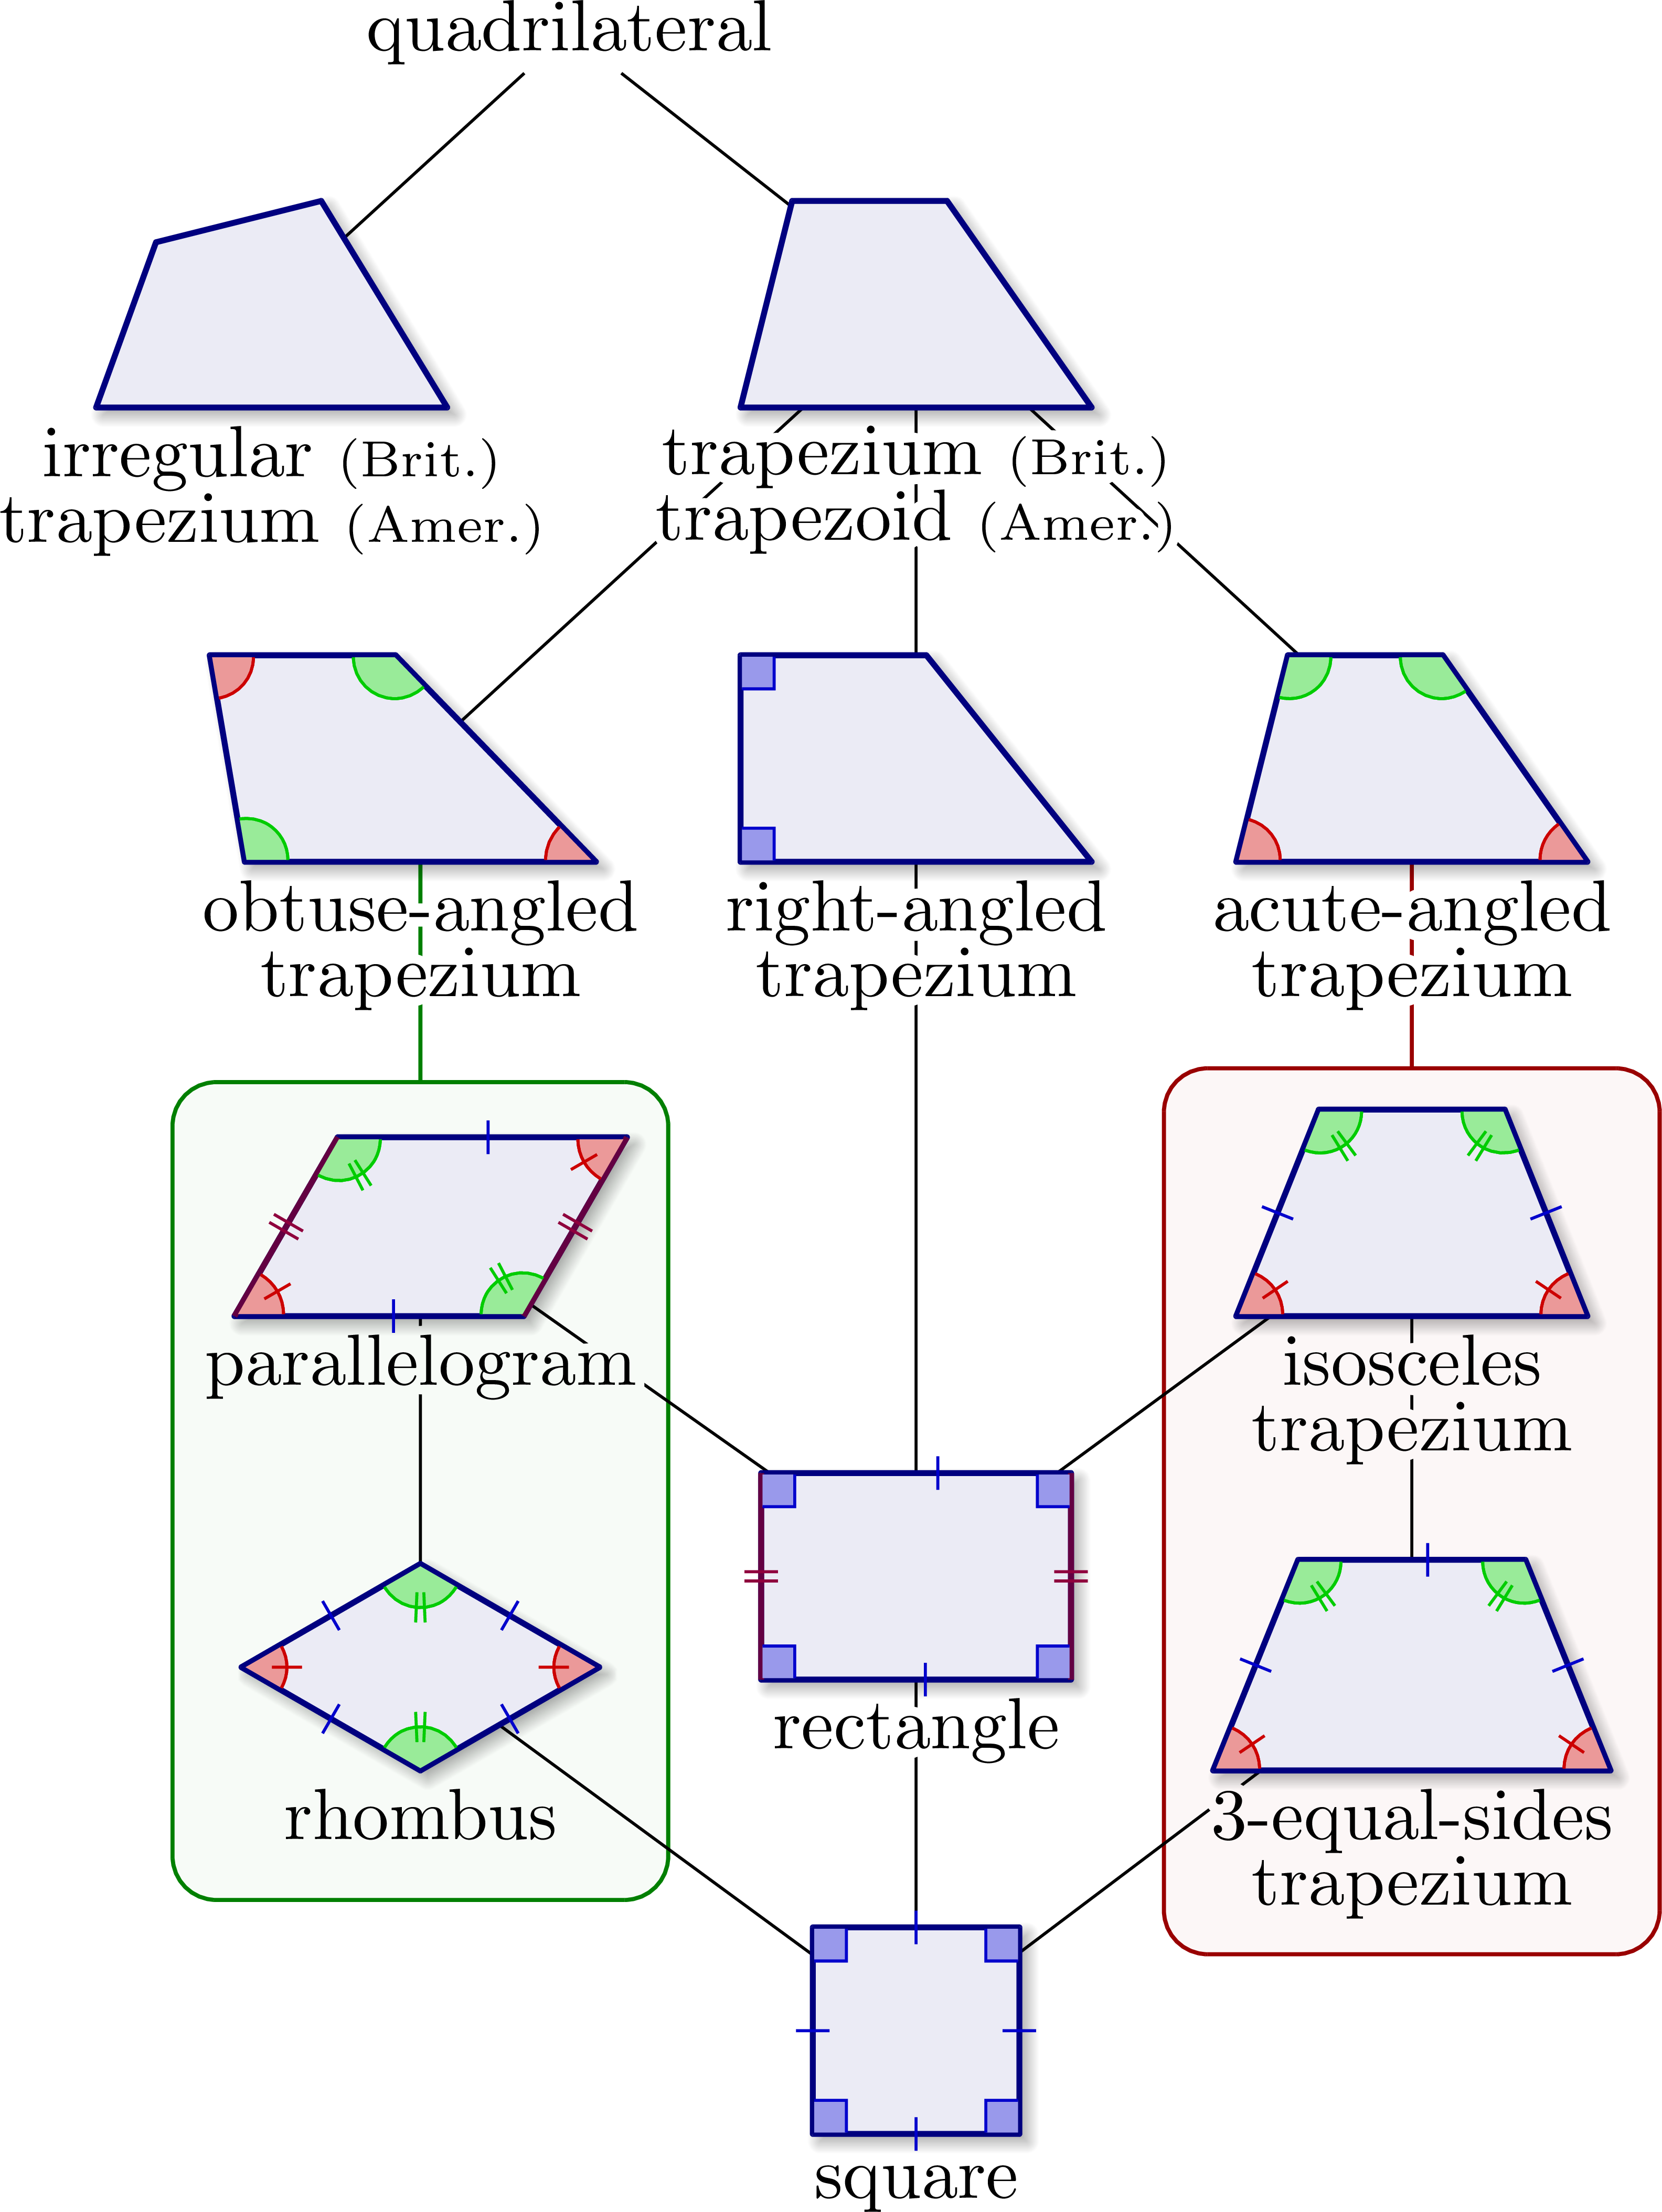
Grouping trapezia in boxes to make clear rectangles are not obtuse or acute trapezia.
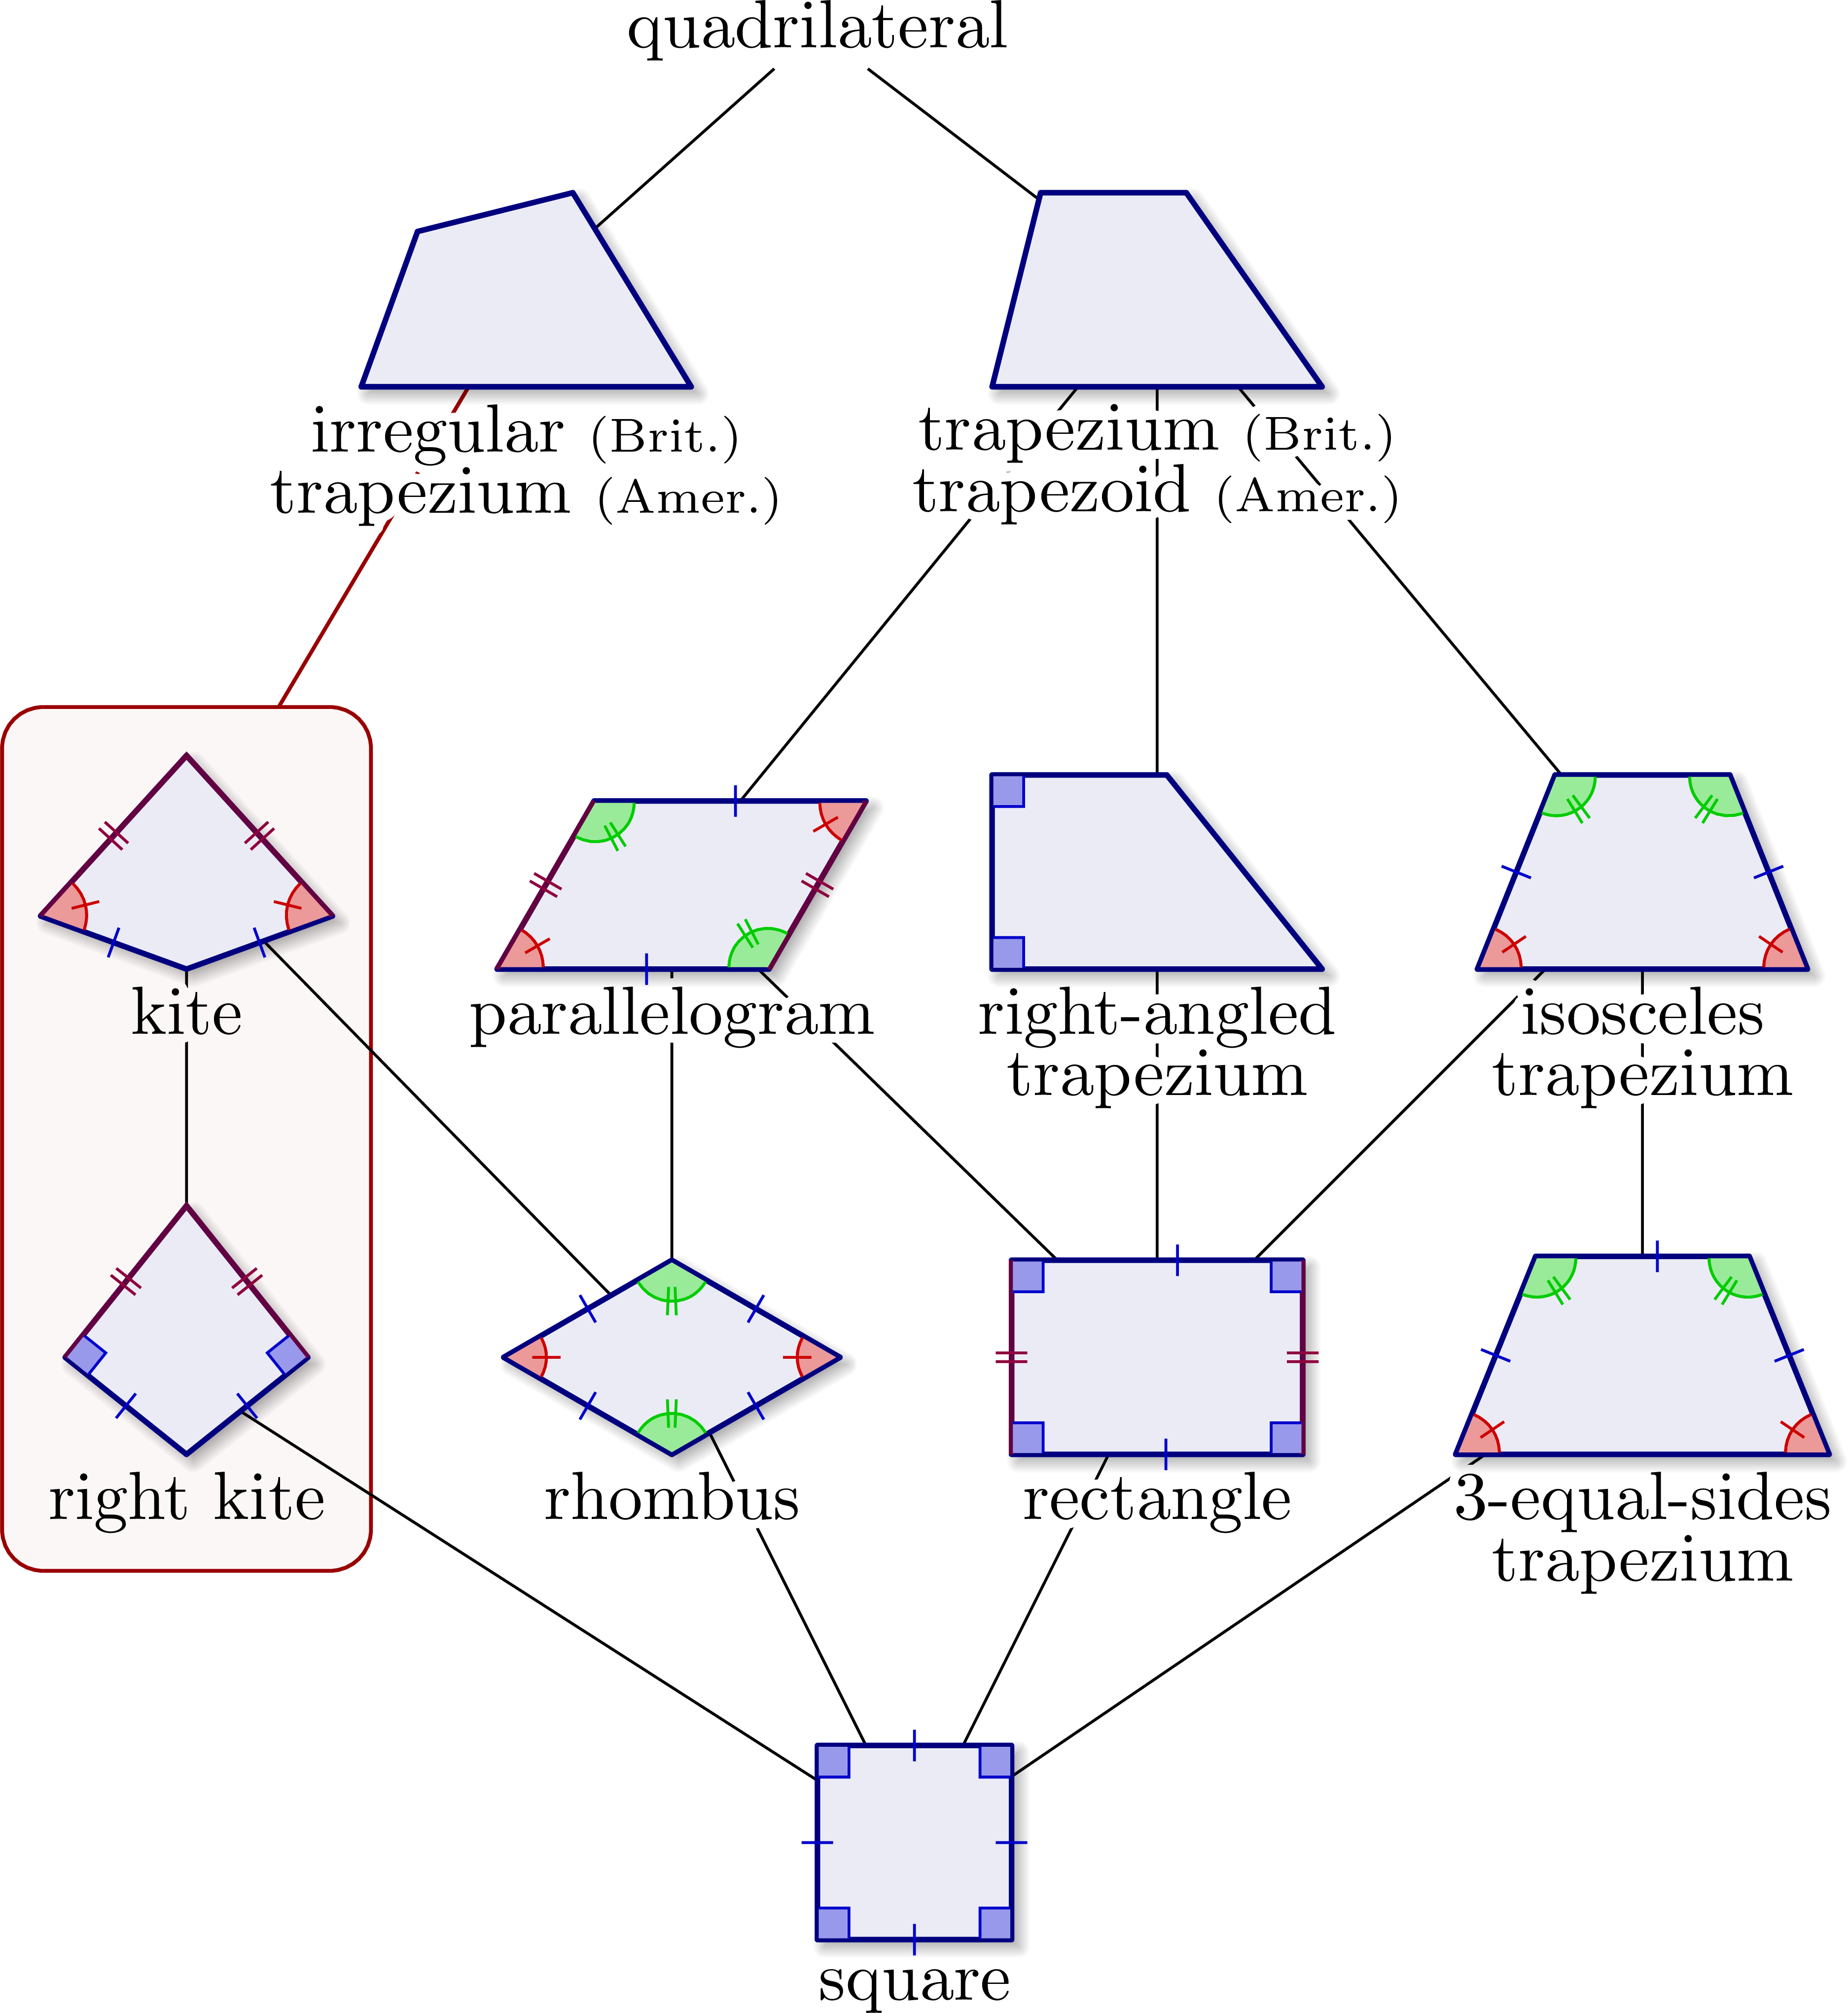
Adding kites:

Using as definition of irregular quadrilateral (British English), quadrilaterals with no parallel sides:
Adding boxes again:
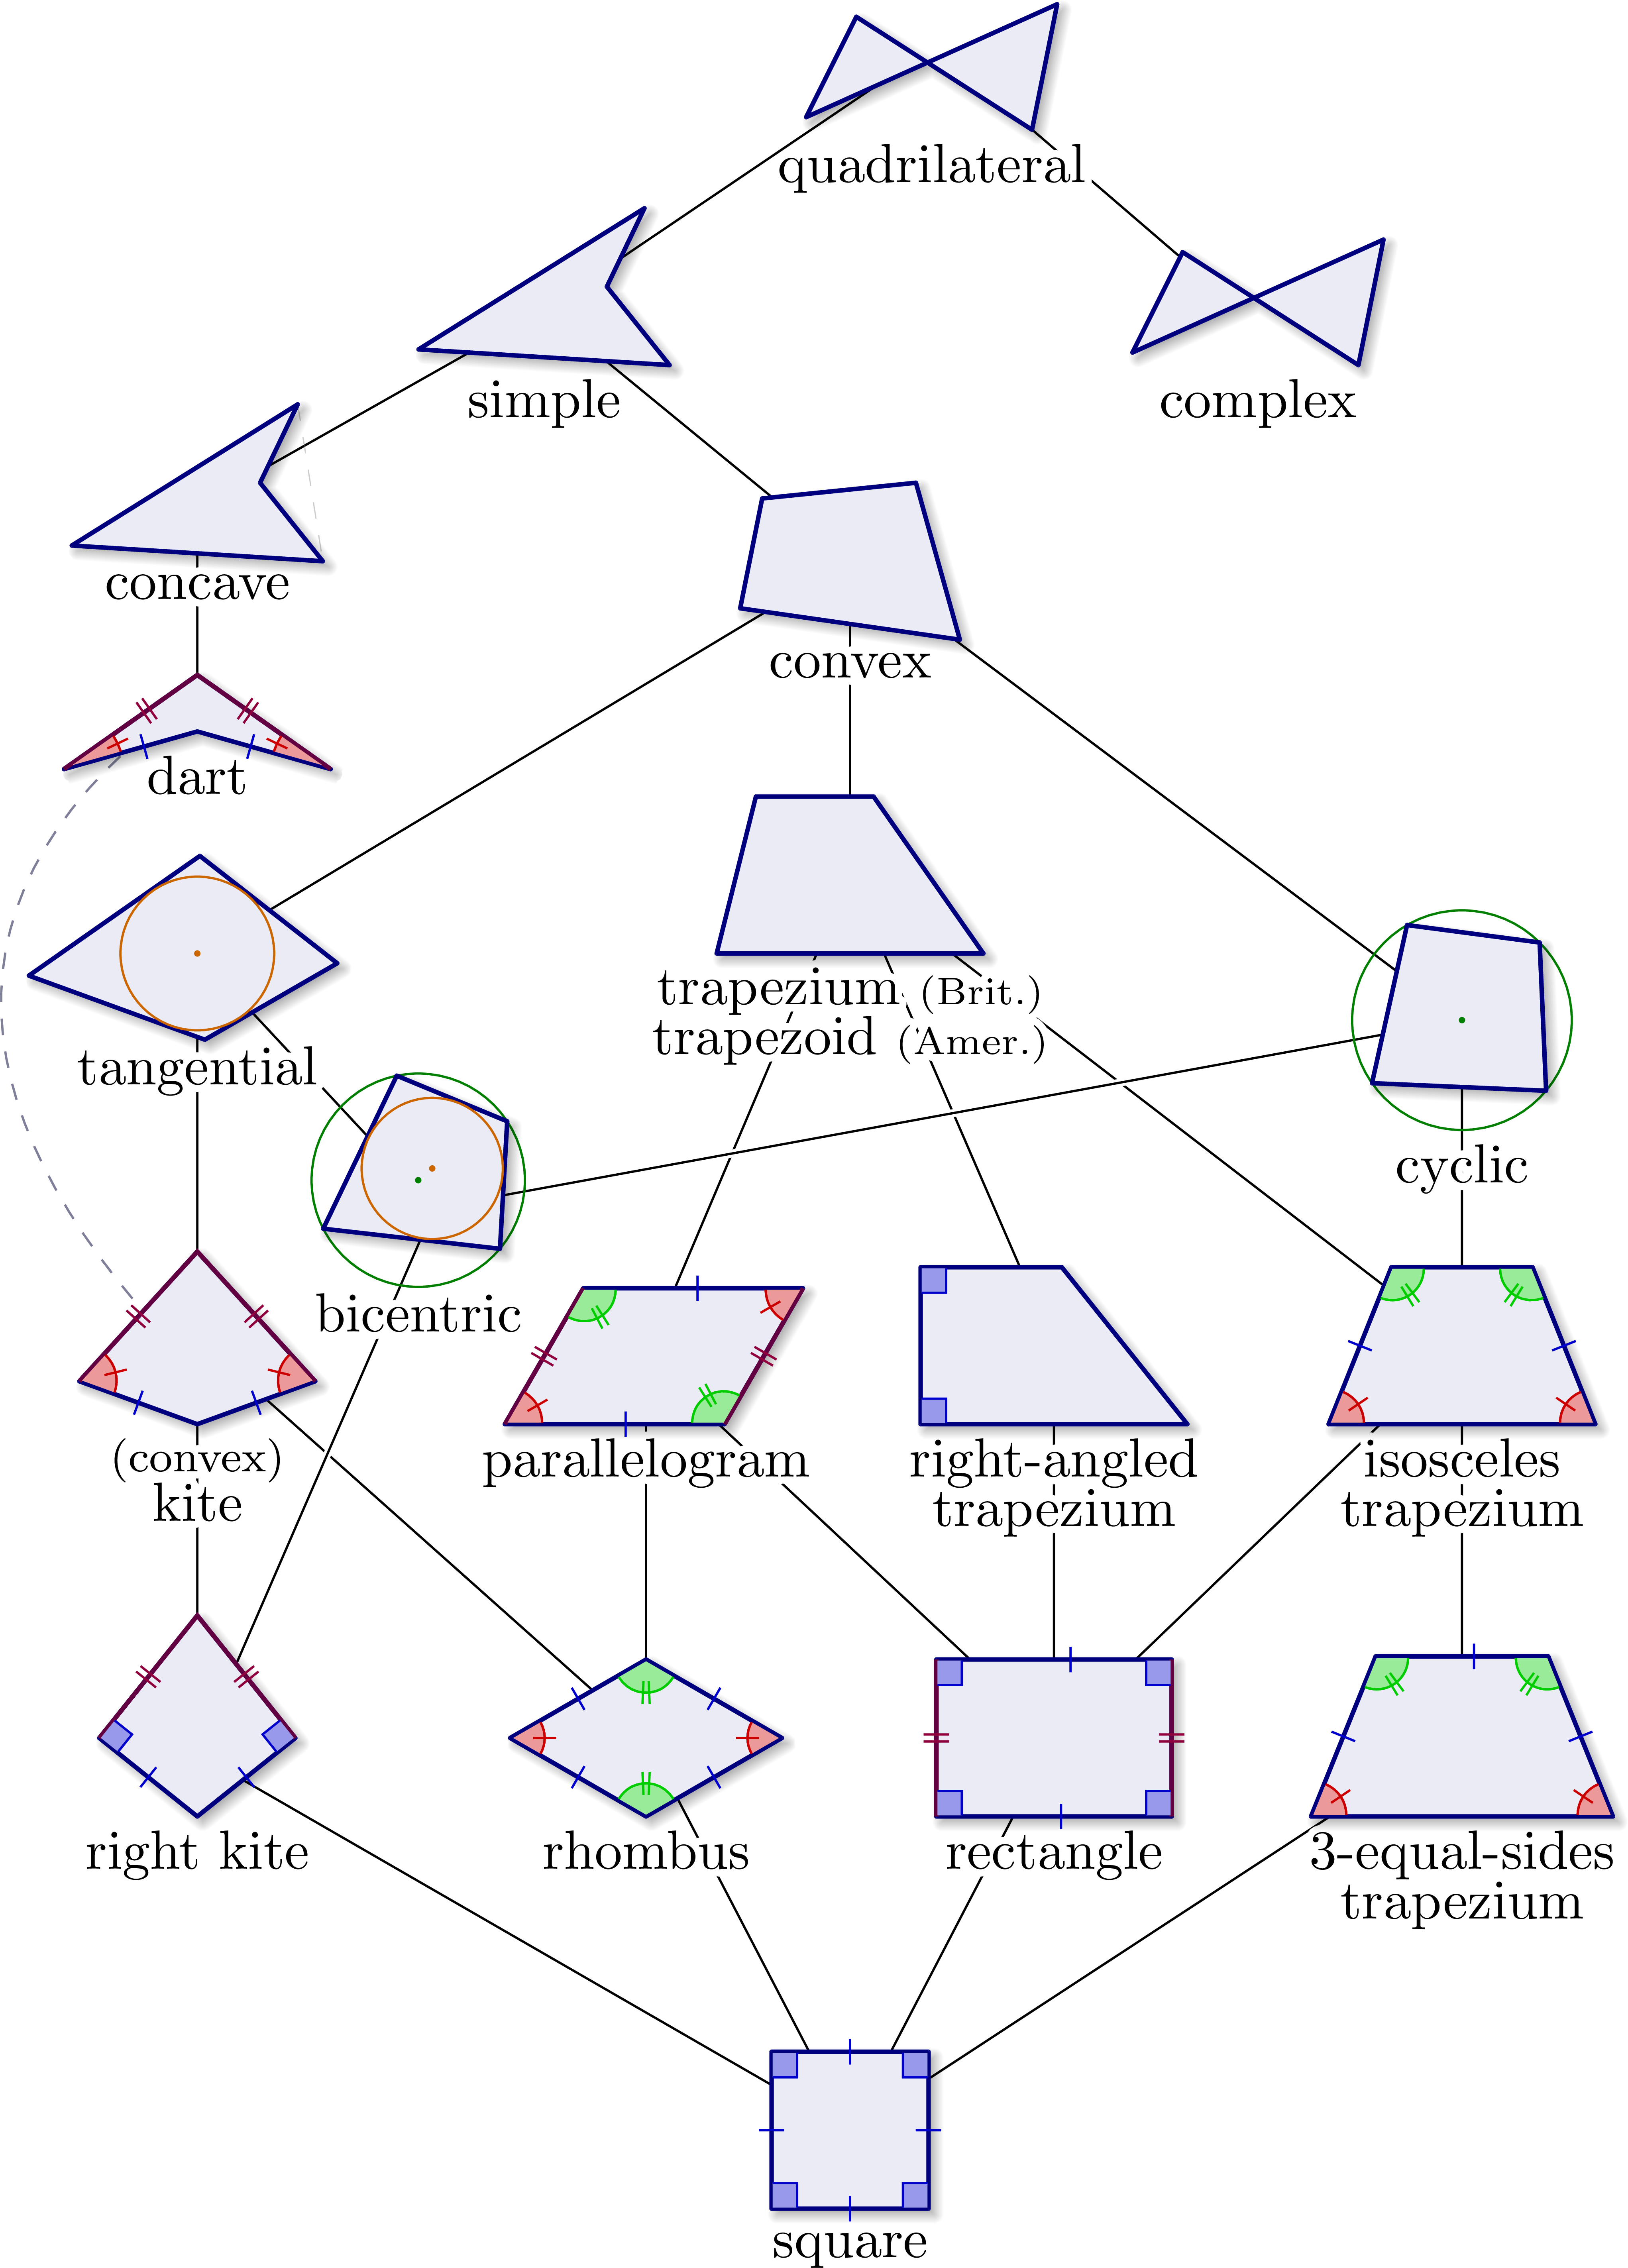
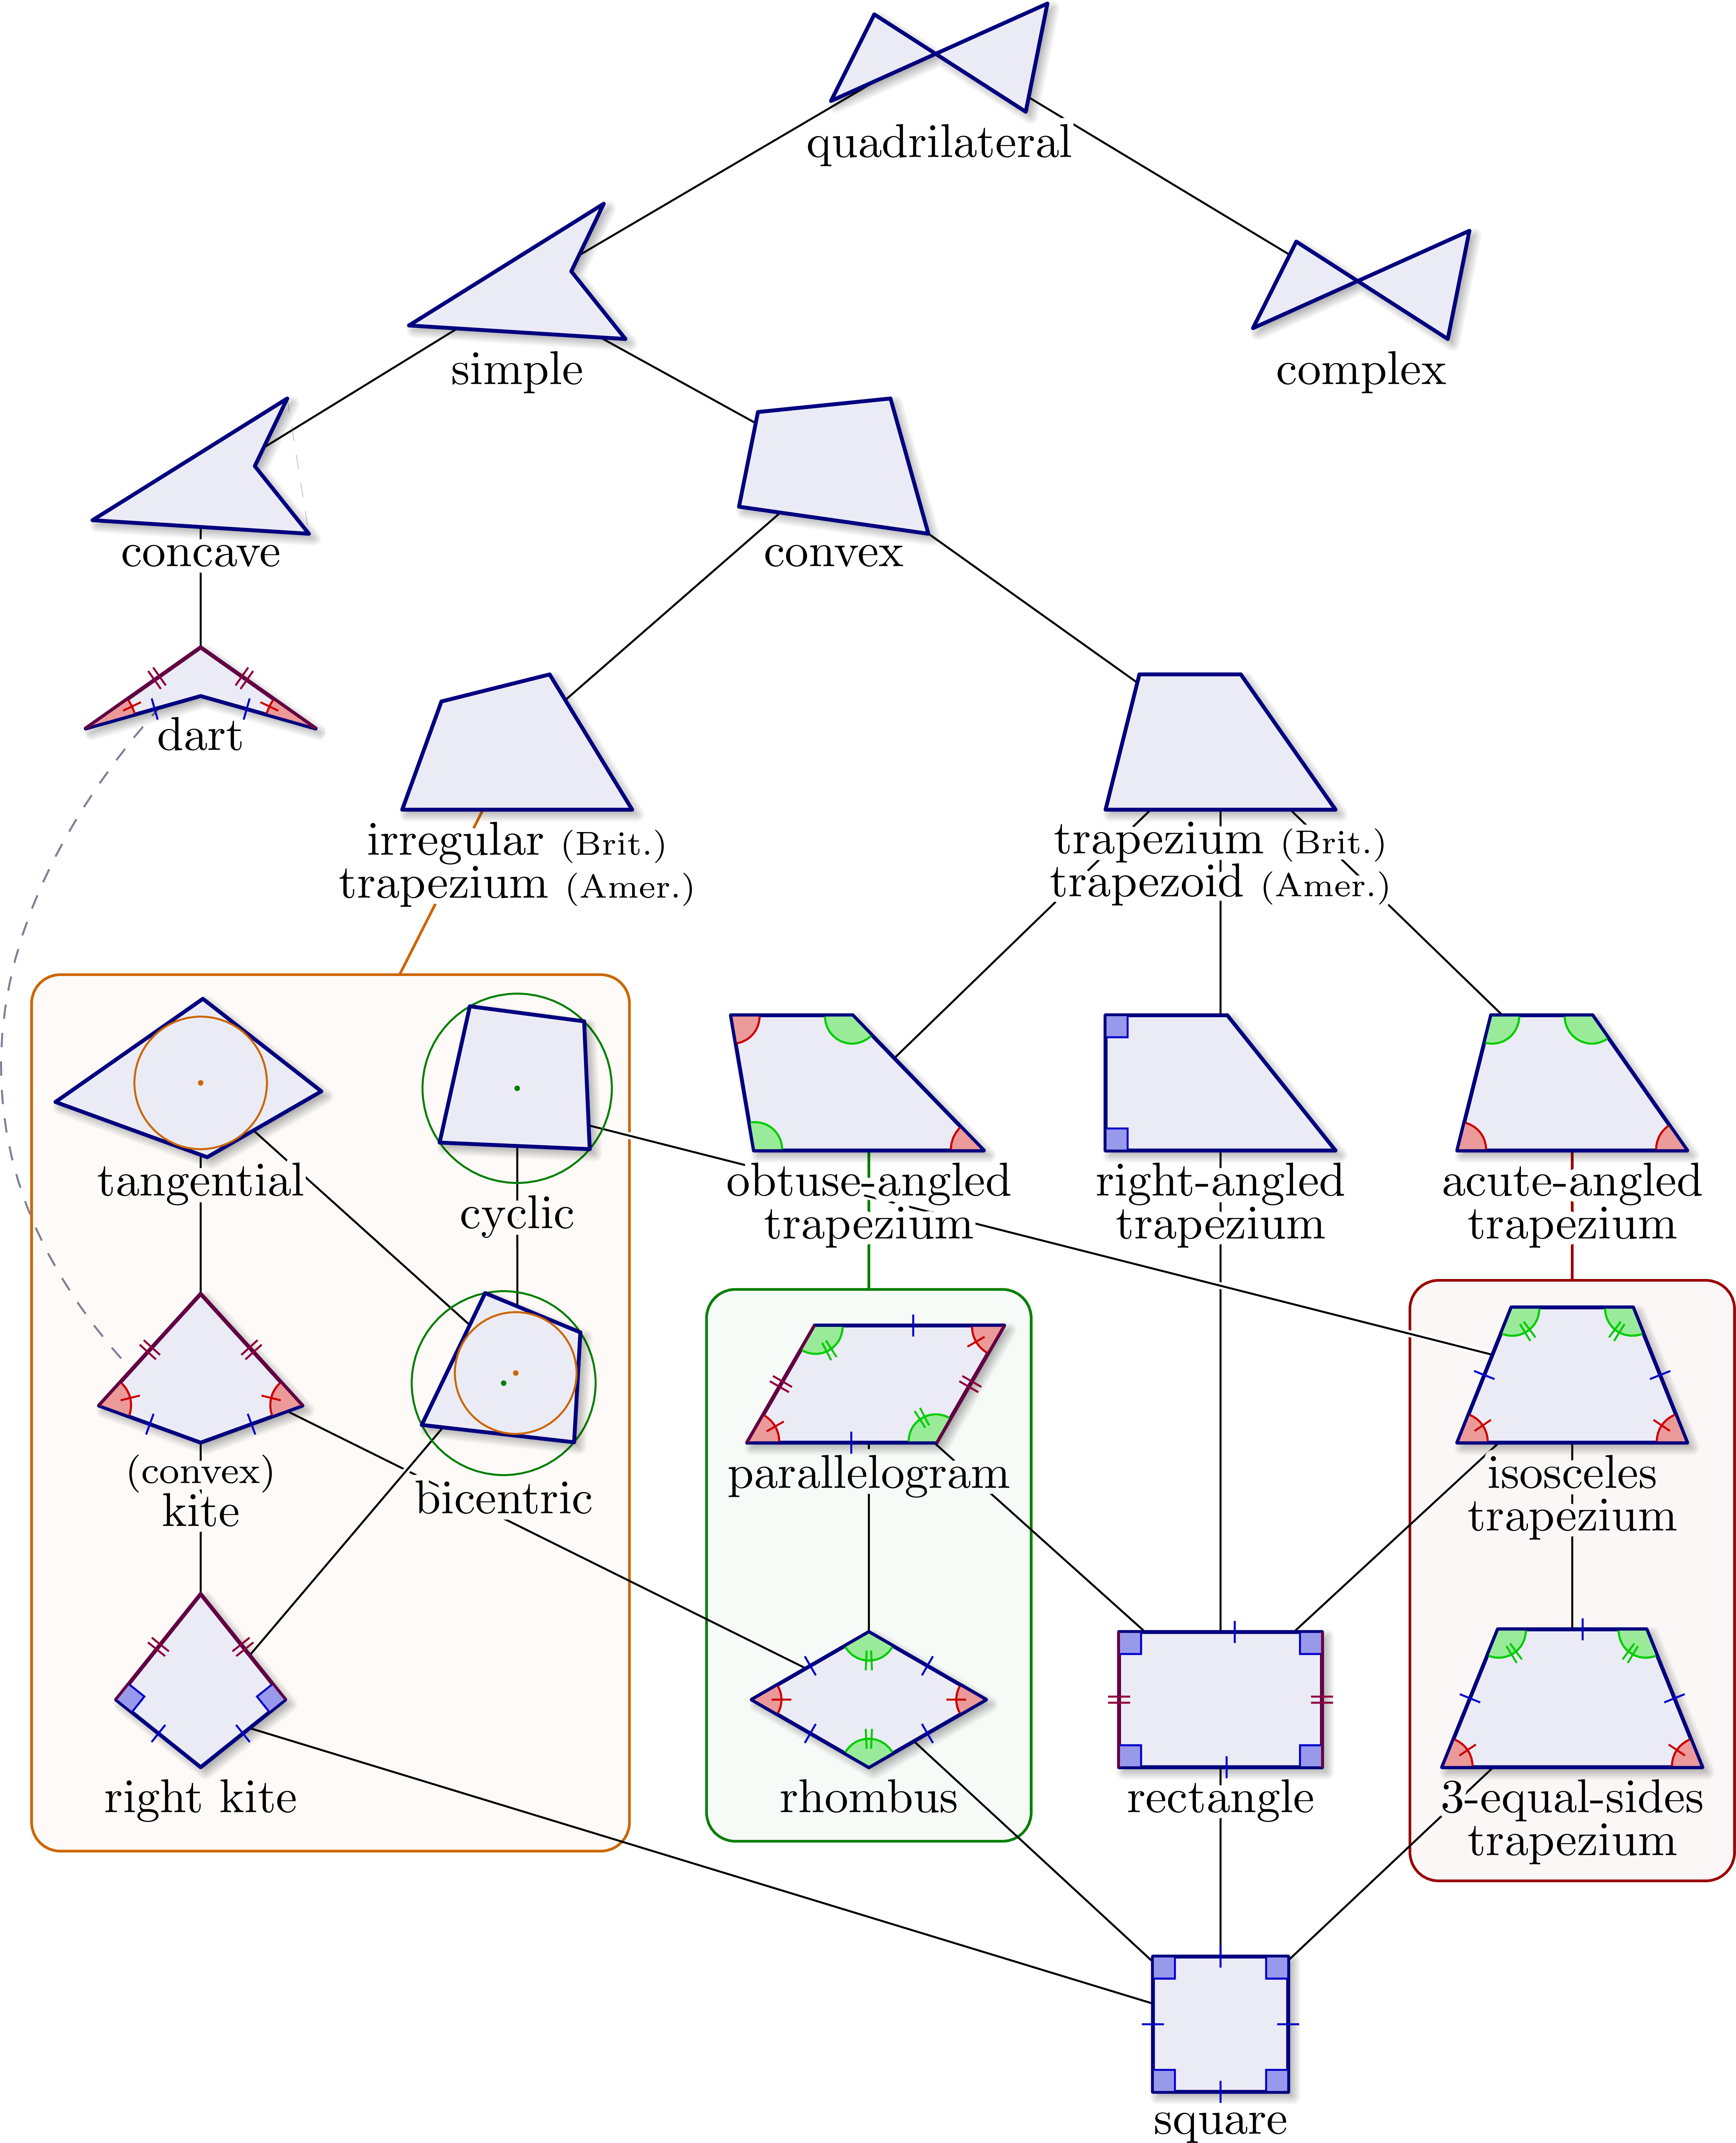
A more general overview, including tangential, bicentric and cyclic quadrilaterals, as well as convex/concave, simple/complex, and darts (i.e. concave kites):
Including obtuse or acute trapezia and boxes again:
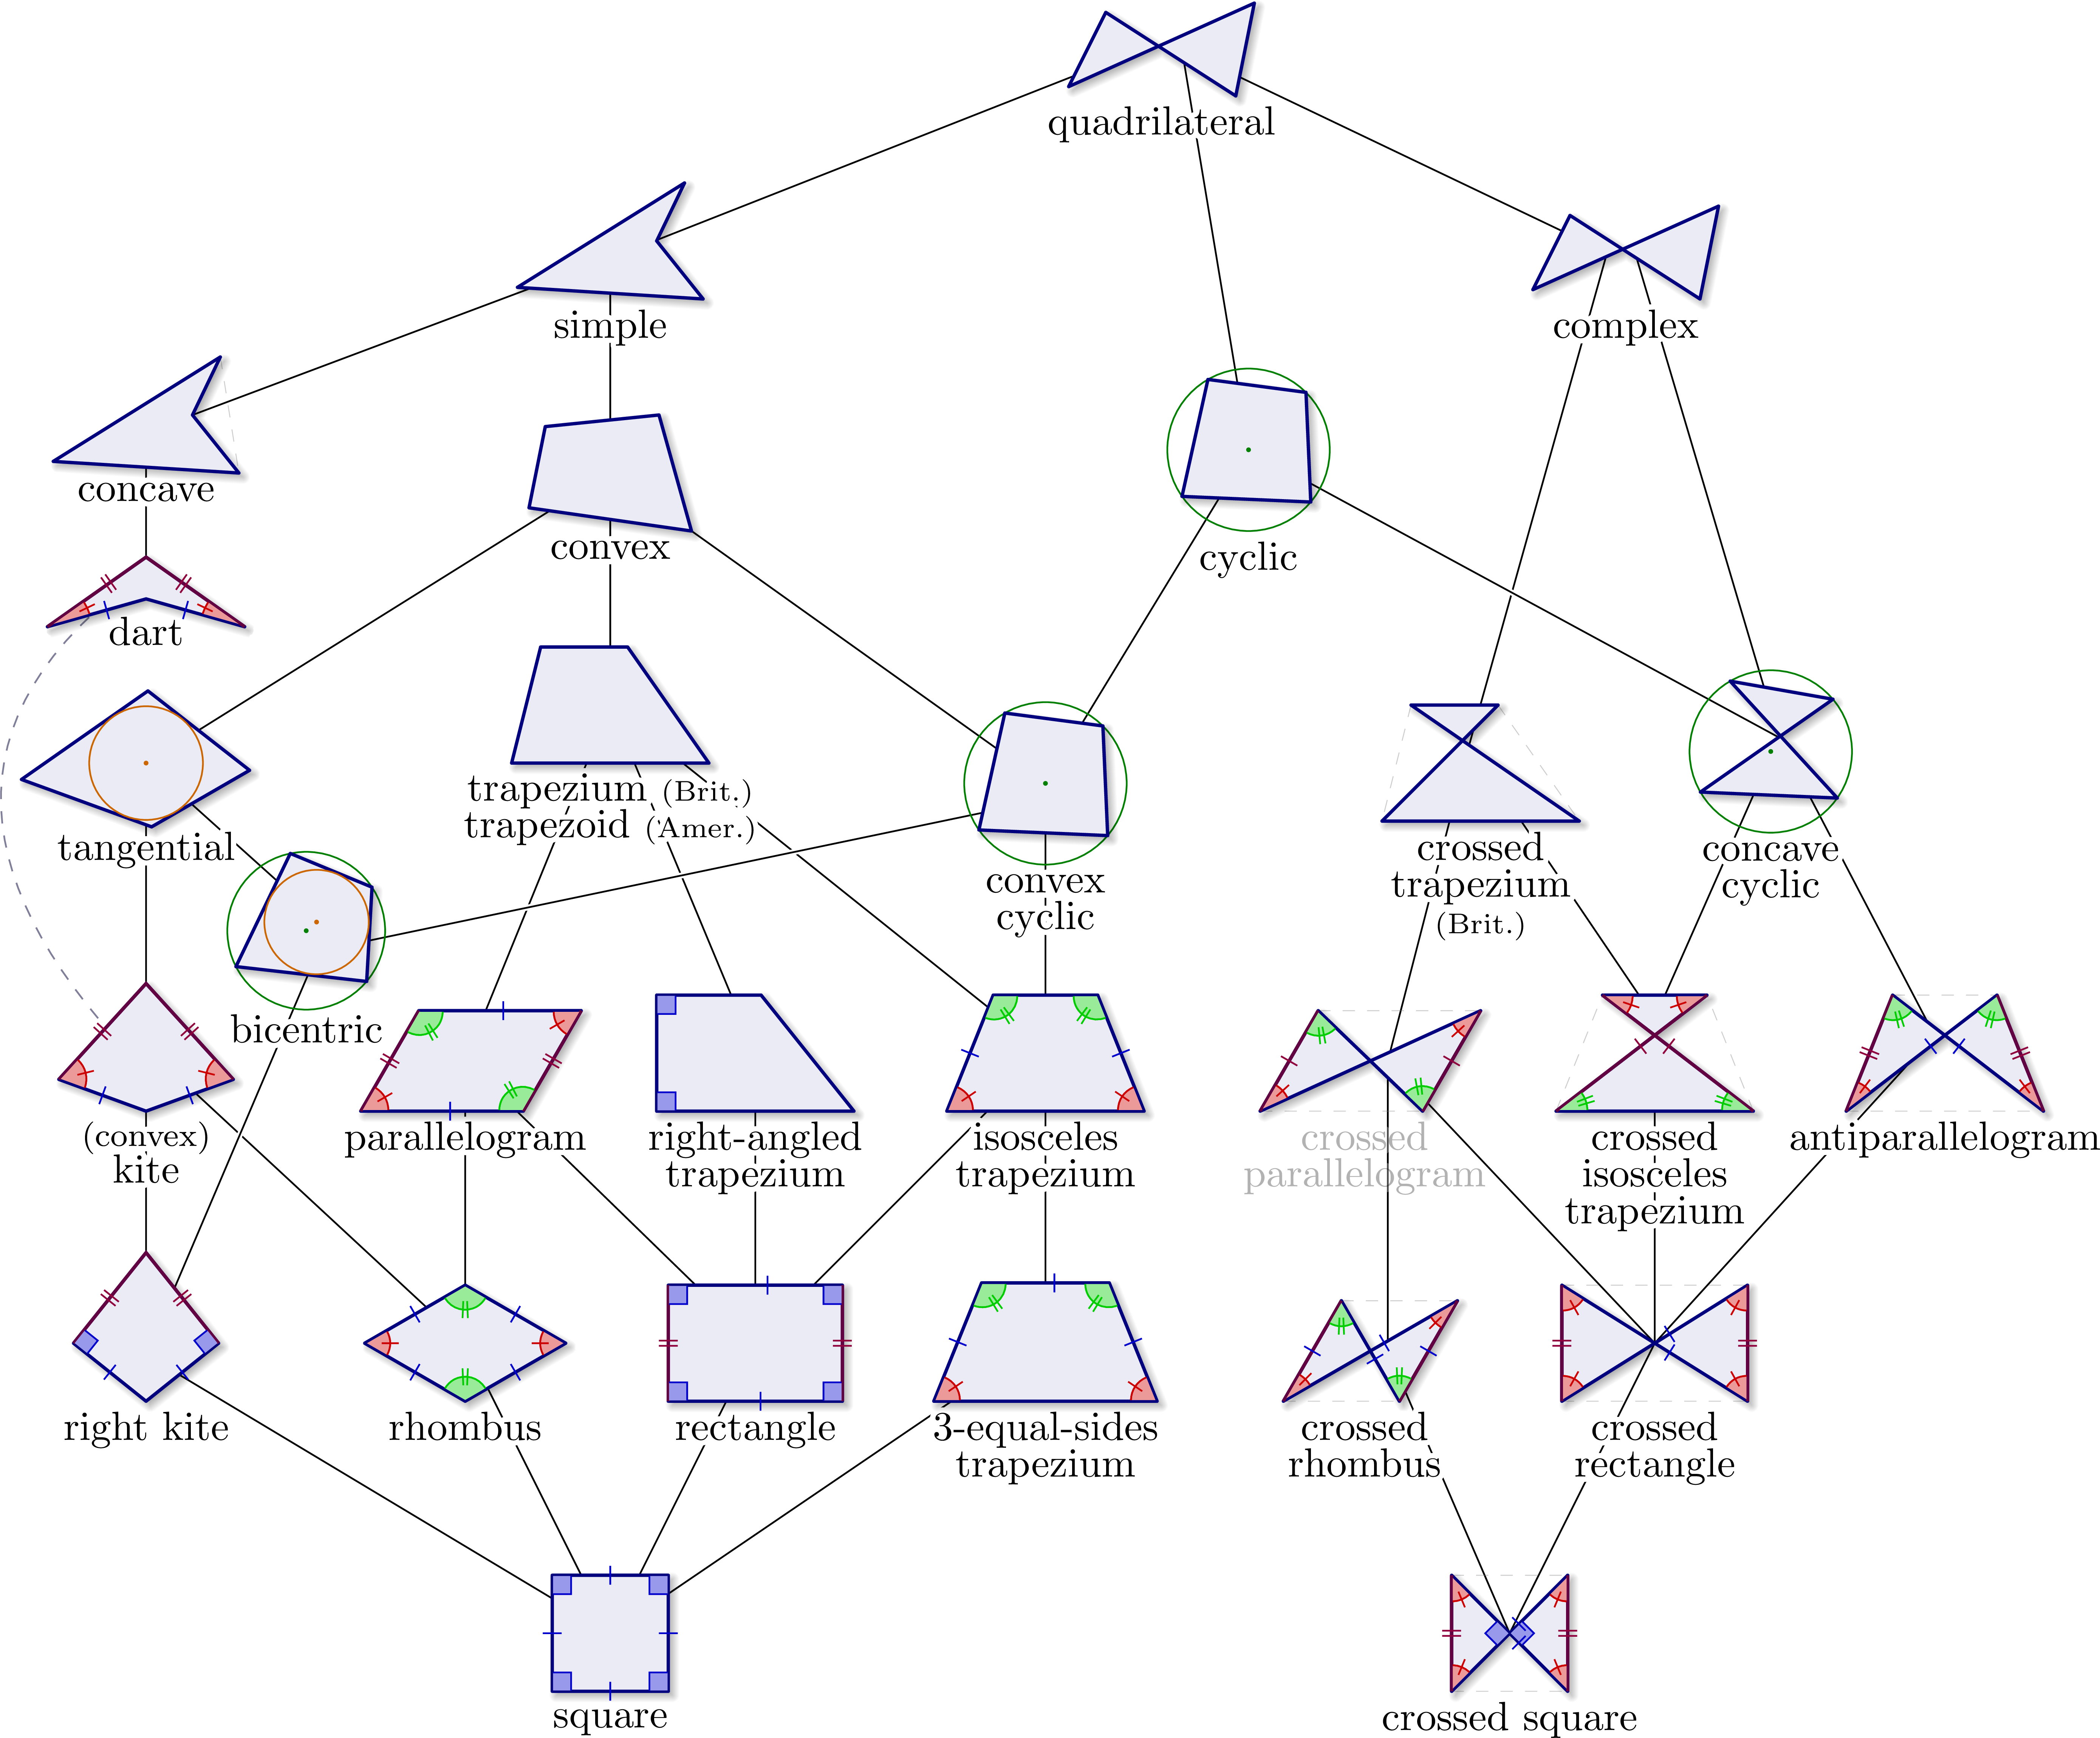
Including some complex quadrilaterals, incl. crossed trapezia, antiparallelogram, crossed rectangle, crossed square and crossed rhombus. (Note that this Wikipedia article uses “crossed parallelogram” as synonym for antiparallelogram, so it is grayed out here.)
Edit and compile the code if you like. (Please note that you may need to remove some tikzpicture pieces to avoid the site’s time limit.)
% Author: Izaak Neutelings (December 2021)
% Inspiration:
%   https://en.wikipedia.org/wiki/Quadrilateral#Taxonomy
%   https://commons.wikimedia.org/wiki/File:Quadrilateral_hierarchy_svg.svg
\documentclass[border=3pt,tikz]{standalone}
\usetikzlibrary{calc}
\usetikzlibrary{shadows.blur} % for blur shadow
\usepackage[outline]{contour} % glow around text
\contourlength{1.3pt}
\tikzset{>=latex} % for LaTeX arrow head

\colorlet{myred}{red!80!black}
\colorlet{myblue}{blue!80!black}
\colorlet{mygreen}{green!80!black}
\colorlet{mypurple}{red!70!blue!80!black}
\colorlet{mydarkred}{red!60!black}
\colorlet{mylightred}{red!50!black!8}
\colorlet{mydarkblue}{blue!50!black}
\colorlet{mydarkgreen}{green!50!black}
\colorlet{mylightblue}{blue!50!black!8}
\colorlet{mydarkorange}{orange!80!black}
\colorlet{mydarkpurple}{red!60!blue!65!black}
\tikzstyle{myshape}=[
  thick,draw=mydarkblue,fill=mylightblue,rounded corners=0.01,
  blur shadow={shadow blur steps=40,shadow xshift=1pt,shadow yshift=-1pt}]
\tikzstyle{myset}=[draw=mydarkred,fill=mydarkred!3,rounded corners=6,line width=0.55]
\tikzstyle{mygreenset}=[myset,draw=mydarkgreen,fill=mydarkgreen!3]
\tikzstyle{myorangeset}=[myset,draw=mydarkorange,fill=mydarkorange!3]
\tikzstyle{mydashed}=[very thin,dashed,draw=black!50,opacity=0.4]
\tikzstyle{purple line}=[thick,draw=mydarkpurple]
\tikzstyle{frontline}=[white,double=black,double distance=0.4,line width=0.5]
\tikzset{
  narcs/.initial=1,      % number of (dark) arcs
  nmarks/.initial=0,     % number of marks to indicate equal angles
  marklen/.initial=0.27, % length of marks
  markdist/.initial=3,   % distance between marks
  markshift/.initial=0,  % shift from origin/center
  angshift/.initial=1,   % shift from origin/center
  angcol/.style={draw=#1,fill=#1!40}, % shorthand to fill (light) & draw (dark)
  angcol/.default={myblue},
  pics/mark angle/.style args={(#1)-(#2)-(#3):#4}{ % arc: any angle
    code={
      \tikzset{narcs/.get=\narcs}
      \tikzset{nmarks/.get=\nmarks}
      \tikzset{marklen/.get=\marklen}
      \tikzset{markdist/.get=\markdist}
      \tikzset{angshift/.get=\angshift}
      \pgfmathanglebetweenpoints{\pgfpointanchor{#2}{center}}{\pgfpointanchor{#1}{center}}
      \pgfmathsetmacro\tmpAngA{\pgfmathresult}
      \pgfmathanglebetweenpoints{\pgfpointanchor{#2}{center}}{\pgfpointanchor{#3}{center}}
      \pgfmathsetmacro\tmpAngB{\tmpAngA<\pgfmathresult?\pgfmathresult:\pgfmathresult+360}
      \pgfmathsetmacro\tmpAveAng{(\tmpAngA+\tmpAngB)/2}
      \coordinate (tmpS) at (\tmpAveAng:{\angshift*0.01/abs(sin((\tmpAngB-\tmpAngA)/2))}); % shift
      \coordinate (tmp#2) at ($(#2)+(tmpS)$);
      \coordinate (tmpA) at ($(tmp#2)+(\tmpAngA:#4)$);
      \fill[pic actions,draw=none] % fill circle segment
        (tmp#2) -- (tmpA) arc(\tmpAngA:\tmpAngB:#4) -- cycle;
      \draw[pic actions,fill=none] (tmpA) arc(\tmpAngA:\tmpAngB:#4);
      \ifnum\narcs>0
        \foreach \i [evaluate={\dr=0.02*\markdist*(\i-1);}] in {1,...,\narcs}{
          \draw[pic actions,fill=none] % draw angle mark
          (tmpA)++(\tmpAngA:-\dr) arc(\tmpAngA:\tmpAngB:#4-\dr);
        }
      \fi
      \ifnum\nmarks>0
        \foreach \i [evaluate={\a=\tmpAveAng+\markdist/(#4)*(\i-0.5-\nmarks/2);}] in {1,...,\nmarks}{
          \draw (tmp#2)++(\a:{#4-\marklen*max(#4/2,\marklen)})
            --++ ({(\a+2*\tmpAveAng)/3}:{2*\marklen*max(#4/2,\marklen)});
      }
      \fi
    }
  },
  pics/right angle/.style args={(#1)-(#2)-(#3):#4}{ % right angle
    code={
      \tikzset{angshift/.get=\angshift}
      \pgfmathanglebetweenpoints{\pgfpointanchor{#2}{center}}{\pgfpointanchor{#1}{center}}
      \pgfmathsetmacro\tmpAngA{\pgfmathresult}
      %\pgfmathanglebetweenpoints{\pgfpointanchor{#2}{center}}{\pgfpointanchor{#1}{center}}
      %\pgfmathsetmacro\tmpAveAng{(\tmpAngA+(\tmpAngA>\pgfmathresult?\pgfmathresult:\pgfmathresult+360))/2}
      \coordinate (tmpS) at (\tmpAngA+45:\angshift*0.01); % shift
      \coordinate (tmp#1) at ($(#1)+(tmpS)$);
      \coordinate (tmp#2) at ($(#2)+(tmpS)$);
      \coordinate (tmp#3) at ($(#3)+(tmpS)$);
      \coordinate (tmpRA) at ($(tmp#2)+(\tmpAngA+45:#4)$);
      \fill[pic actions,draw=none] % fill square area
        ($(tmp#2)!(tmpRA)!(tmp#1)$) -- (tmpRA) -- ($(tmp#2)!(tmpRA)!(tmp#3)$) -- (tmp#2) -- cycle;
      \draw[pic actions,fill=none] % draw orthogonal mark
        ($(tmp#2)!(tmpRA)!(tmp#1)$) -- (tmpRA) -- ($(tmp#2)!(tmpRA)!(tmp#3)$);
    }
  },
  pics/mark line/.style args={(#1)-(#2):#3}{ % mark equal lengths
    code={
      \tikzset{nmarks/.get=\nmarks}
      \tikzset{marklen/.get=\marklen}
      \tikzset{markdist/.get=\markdist}
      \tikzset{markshift/.get=\markshift}
      \pgfmathanglebetweenpoints{\pgfpointanchor{#2}{center}}{\pgfpointanchor{#1}{center}}
      \pgfmathsetmacro\tmpAng{\pgfmathresult}
      \pgfmathsetmacro\nmarks{int(\nmarks==0?1:\nmarks)}
      \coordinate (tmpM) at ($(#1)!0.5+\markshift!(#2)$); % midpoint
      \foreach \i [parse=true] in {1,...,\nmarks)}{
        \draw ($(tmpM)+(\tmpAng:{(\i-0.5-\nmarks/2)*0.015*\markdist})$)
          ++(\tmpAng+#3-180:0.3*\marklen) --++ (\tmpAng+#3:0.6*\marklen);
      }
    }
  }
}
%\def\name#1#2{\node[below=-1,align=center] at (#1) {\contour{white}{#2}};}
\pgfdeclarelayer{back} % to draw on background
\pgfsetlayers{back,main} % set order

\begin{document}


%%%%%%%%%%%%%%%%%%%%%%%
%   COMMON TRAPEZIA   %
%%%%%%%%%%%%%%%%%%%%%%%

\def\xsquare{0.5}       % x position square
\def\ysquare{0.0}       % y position square
\def\yrectangle{1.0}    % y position rectangle
\def\yrighttrap{2.0}    % y position right-angled trapezium
\def\colpara{white}     % contour color for parallelograms
\def\coltrap{white}     % contour color for isosceles trapezia
\def\commontraps{       % trapezia common in each picture
  \message{^^J  Common trapezia}

  %%%% LEVEL 1 %%%%%%%%%%%%%%%%%%%%%%%%%%

  % SQUARE
  \def\a{1.0}  % length of each sides
  \begin{scope}[shift={(\xsquare*\W,\ysquare*\H)}]
    \node[below=1] at (0,0) {\contour{white}{square}};
    \coordinate (SW) at (-\a/2, 0);
    \coordinate (NW) at (-\a/2,\a);
    \coordinate (NE) at ( \a/2,\a);
    \coordinate (SE) at ( \a/2, 0);
    \coordinate (square) at (0,\a/2);
    \draw[myshape] (SW) rectangle (NE);
    \pic[angcol=myblue] {right angle={(SE)-(SW)-(NW):0.22}};
    \pic[angcol=myblue] {right angle={(SW)-(NW)-(NE):0.22}};
    \pic[angcol=myblue] {right angle={(NW)-(NE)-(SE):0.22}};
    \pic[angcol=myblue] {right angle={(NE)-(SE)-(SW):0.22}};
    \pic[myblue] {mark line={(NE)-(NW):90}};
    \pic[myblue] {mark line={(NW)-(SW):90}};
    \pic[myblue] {mark line={(SW)-(SE):90}};
    \pic[myblue] {mark line={(NE)-(SE):90}};
  \end{scope}

  %%%% LEVEL 2 %%%%%%%%%%%%%%%%%%%%%%%%%%

  % RHOMBUS
  \def\ang{60} % smaller vertex angle (N or SW)
  \pgfmathsetmacro\h{\a*sqrt(2-2*cos(\ang))} % height / diagonal
  \begin{scope}[shift={(-0.5*\W,\H)}]
    \node[below=-1] at (0,0) {\contour{\colpara}{rhombus}};
    %\coordinate (SW) at (-\a/2,0);
    %\coordinate (SE) at (\a/2,0);
    %\coordinate (NW) at ($(SW)+(\ang:\a)$);
    %\coordinate (NE) at ($(SE)+(\ang:\a)$);
    %\draw[myshape] (SW) -- (SE) -- (NE) -- (NW) -- cycle;
    %\pic[nmarks=1,angcol=myred]   {mark angle={(SE)-(SW)-(NW):0.20}};
    %\pic[nmarks=2,angcol=mygreen] {mark angle={(SW)-(NW)-(NE):0.20}};
    %\pic[nmarks=1,angcol=myred]   {mark angle={(NW)-(NE)-(SE):0.20}};
    %\pic[nmarks=2,angcol=mygreen] {mark angle={(NE)-(SE)-(SW):0.20}};
    \coordinate (S) at (0,0);
    \coordinate (E) at (\ang/2:\a);
    \coordinate (W) at (180-\ang/2:\a);
    \coordinate (N) at (0,\h);
    \coordinate (rhombus) at (0,\h/2);
    \draw[myshape] (S) -- (W) -- (N) -- (E) -- cycle;
    \pic[nmarks=2,angcol=mygreen] {mark angle={(W)-(N)-(E):0.20}};
    \pic[nmarks=2,angcol=mygreen] {mark angle={(E)-(S)-(W):0.20}};
    \pic[nmarks=1,angcol=myred]   {mark angle={(N)-(E)-(S):0.20}};
    \pic[nmarks=1,angcol=myred]   {mark angle={(S)-(W)-(N):0.20}};
    \pic[myblue] {mark line={(S)-(E):90}};
    \pic[myblue] {mark line={(E)-(N):90}};
    \pic[myblue] {mark line={(N)-(W):90}};
    \pic[myblue] {mark line={(W)-(S):90}};
  \end{scope}

  % RECTANGLE
  \def\a{1.0} % length of short side
  \def\b{1.5} % length of long side
  \begin{scope}[shift={(0.5*\W,\yrectangle*\H)}]
    \node[below=-1] at (0,0) {\contour{white}{rectangle}};
    \coordinate (SW) at (-\b/2,0);
    \coordinate (NW) at (-\b/2,\a);
    \coordinate (NE) at ( \b/2,\a);
    \coordinate (SE) at ( \b/2,0);
    \coordinate (rectangle) at (0,\a/2);
    \draw[myshape] (SW) rectangle (NE);
    \draw[purple line] (SW) -- (NW) (SE) -- (NE);
    \pic[angcol=myblue] {right angle={(SE)-(SW)-(NW):0.22}};
    \pic[angcol=myblue] {right angle={(SW)-(NW)-(NE):0.22}};
    \pic[angcol=myblue] {right angle={(NW)-(NE)-(SE):0.22}};
    \pic[angcol=myblue] {right angle={(NE)-(SE)-(SW):0.22}};
    \pic[nmarks=1,markshift=0.07,myblue] {mark line={(NW)-(NE):90}};
    \pic[nmarks=1,markshift=0.03,myblue] {mark line={(SW)-(SE):90}};
    \pic[nmarks=2,mypurple] {mark line={(NW)-(SW):90}};
    \pic[nmarks=2,mypurple] {mark line={(NE)-(SE):90}};
  \end{scope}

  % 3-equal-sides TRAPEZIUM
  \def\a{1.1}  % length of short sides
  \def\ang{68} % length of long side
  \begin{scope}[shift={(1.5*\W,\H)}]
    \node[below=-1,align=center] at (0,0) {
      \contour{\coltrap}{3-equal-sides}\\[-0.3em]
      \contour{\coltrap}{trapezium}};
    \coordinate (SW) at ({-\a*(cos(\ang)+0.5)},0);
    \coordinate (NW) at (-\a/2,{\a*sin(\ang)});
    \coordinate (NE) at ( \a/2,{\a*sin(\ang)});
    \coordinate (SE) at ({\a*(cos(\ang)+0.5)},0);
    \coordinate (3 trapezium) at (0,\a/2);
    \draw[myshape] (SW) -- (SE) -- (NE) -- (NW) -- cycle;
    \pic[nmarks=2,angcol=mygreen] {mark angle={(SW)-(NW)-(NE):0.20}};
    \pic[nmarks=2,angcol=mygreen] {mark angle={(NW)-(NE)-(SE):0.20}};
    \pic[nmarks=1,angcol=myred]   {mark angle={(SE)-(SW)-(NW):0.21}};
    \pic[nmarks=1,angcol=myred]   {mark angle={(NE)-(SE)-(SW):0.21}};
    \pic[myblue,markshift=-0.07] {mark line={(NE)-(NW):90}};
    \pic[myblue,markshift= 0.0]  {mark line={(NW)-(SW):90}};
    \pic[myblue,markshift= 0.0]  {mark line={(NE)-(SE):90}};
  \end{scope}

  %%%% LEVEL 3 %%%%%%%%%%%%%%%%%%%%%%%%%%

  % PARALLELOGRAM
  \begin{scope}[shift={(-0.5*\W,2*\H)}]
    \node[below=-1] at (0,0) {\contour{\colpara}{parallelogram}};
    \def\a{1.0}  % length short sides
    \def\b{1.4}  % length long sides
    \def\ang{60} % smaller vertex angle (SW)
    \coordinate (SW) at ({-\b/2-0.4*\a*cos(\ang)},0);
    \coordinate (SE) at ($(SW)+(\b,0)$);
    \coordinate (NW) at ($(SW)+(\ang:\a)$);
    \coordinate (NE) at ($(SE)+(\ang:\a)$);
    \coordinate (parallelogram) at (0,{\a*sin(\ang)/2});
    \draw[myshape] (SW) -- (SE) -- (NE) -- (NW) -- cycle;
    \draw[purple line] (SW) -- (NW) (SE) -- (NE);
    \pic[nmarks=2,angcol=mygreen] {mark angle={(SW)-(NW)-(NE):0.20}};
    \pic[nmarks=2,angcol=mygreen] {mark angle={(NE)-(SE)-(SW):0.20}};
    \pic[nmarks=1,angcol=myred]   {mark angle={(SE)-(SW)-(NW):0.22}};
    \pic[nmarks=1,angcol=myred]   {mark angle={(NW)-(NE)-(SE):0.22}};
    \pic[nmarks=1,markshift=0.02,myblue] {mark line={(NW)-(NE):90}};
    \pic[nmarks=1,markshift=0.05,myblue] {mark line={(SW)-(SE):90}};
    \pic[nmarks=2,mypurple] {mark line={(NW)-(SW):90}};
    \pic[nmarks=2,mypurple] {mark line={(NE)-(SE):90}};
  \end{scope}

  % RIGHT-ANGLED TRAPEZIUM
  \begin{scope}[shift={(0.5*\W,\yrighttrap*\H)}]
    \node[below=-1,align=center] at (0,0) {
      \contour{white}{right-angled}\\[-0.3em]
      \contour{white}{trapezium}};
    \def\h{1.0} % height
    \def\a{0.9} % length of short horizontal sides
    \def\b{1.7} % length of long horizontal sides
    \coordinate (SW) at (-\b/2,0);
    \coordinate (NW) at (-\b/2,\h);
    \coordinate (NE) at (\a-\b/2,\h);
    \coordinate (SE) at (\b/2,0);
    \coordinate (right trapezium) at (0,\h/2);
    \draw[myshape] (SW) -- (SE) -- (NE) -- (NW) -- cycle;
    \pic[angcol=myblue] {right angle={(SE)-(SW)-(NW):0.22}};
    \pic[angcol=myblue] {right angle={(SW)-(NW)-(NE):0.22}};
  \end{scope}

  % ISOSCELES TRAPEZIUM
  \begin{scope}[shift={(1.5*\W,2*\H)}]
    \node[below=-1,align=center] at (0,0) {
      \contour{\coltrap}{isosceles}\\[-0.3em]
      \contour{\coltrap}{trapezium}};
    \def\h{1.0} % height
    \def\a{0.9} % length of short horizontal sides
    \def\b{1.7} % length of long horizontal sides
    \coordinate (SW) at (-\b/2,0);
    \coordinate (NW) at (-\a/2,\h);
    \coordinate (NE) at ( \a/2,\h);
    \coordinate (SE) at ( \b/2,0);
    \coordinate (2 trapezium) at (0,\h/2);
    \draw[myshape] (SW) -- (SE) -- (NE) -- (NW) -- cycle;
    \pic[nmarks=2,angcol=mygreen] {mark angle={(SW)-(NW)-(NE):0.20}};
    \pic[nmarks=2,angcol=mygreen] {mark angle={(NW)-(NE)-(SE):0.20}};
    \pic[nmarks=1,angcol=myred]   {mark angle={(SE)-(SW)-(NW):0.21}};
    \pic[nmarks=1,angcol=myred]   {mark angle={(NE)-(SE)-(SW):0.21}};
    \pic[myblue,markshift= 0.0] {mark line={(NW)-(SW):90}};
    \pic[myblue,markshift= 0.0] {mark line={(NE)-(SE):90}};
  \end{scope}

}


%%%%%%%%%%%%%%%%%%%%
%   COMMON KITES   %
%%%%%%%%%%%%%%%%%%%%

\def\xkite{-1.5}    % x position kites (to shift for bicentric)
\def\ykite{2}       % y position kites (to shift for bicentric)
\def\colkite{white} % contour color for kites
\def\commonkites{ % common kites in each picture
  \message{^^J  Common kites}

  %%%% LEVEL 2 %%%%%%%%%%%%%%%%%%%%%%%%%%

  % RIGHT KITE
  % https://en.wikipedia.org/wiki/Right_kite#Metric_formulas
  \begin{scope}[shift={(\xkite*\W,\H)}]
    \node[below=-1] at (0,0) {\contour{\colkite}{right kite}};
    \def\a{0.8} % length short sides
    \def\b{1.0} % length long sides
    \pgfmathsetmacro\ang{atan2(\b,\a)} % acute angle
    \coordinate (S) at (0,0);
    \coordinate (E) at (90-\ang:\a);
    \coordinate (N) at (0,{sqrt(\a^2+\b^2)}); % diagonal
    \coordinate (W) at (90+\ang:\a);
    \coordinate (right kite) at (0,\a/2);
    \draw[myshape] (S) -- (E) -- (N) -- (W) -- cycle;
    \draw[purple line] (E) -- (N) -- (W);
    \pic[angcol=myblue]  {right angle={(S)-(W)-(N):0.20}};
    \pic[angcol=myblue]  {right angle={(N)-(E)-(S):0.20}};
    \pic[nmarks=2,mypurple] {mark line={(E)-(N):90}};
    \pic[nmarks=2,mypurple] {mark line={(N)-(W):90}};
    \pic[nmarks=1,myblue]   {mark line={(S)-(E):90}};
    \pic[nmarks=1,myblue]   {mark line={(W)-(S):90}};
  \end{scope}

  %%%% LEVEL 3 %%%%%%%%%%%%%%%%%%%%%%%%%%

  % KITE
  \begin{scope}[shift={(\xkite*\W,\ykite*\H)}]
    \ifdim \xkite pt=-1.5 pt \relax % for reduced version
      \node[below=-1] at (0,0) {\contour{\colkite}{kite}};
    \else
      \ifdim \xkite pt=-1.7 pt \relax % for reduced version
        \node[below=-1] at (0,0) {\contour{\colkite}{kite}}; % for extended versions
      \else
        \node[below=-1,align=center] at (0,0) {
          \contour{\colkite}{\footnotesize(convex)}\\[-0.3em]
          \contour{\colkite}{kite}};
      \fi
    \fi
    \def\a{0.8}   % length short sides
    \def\h{1.1}   % height of northern vertex
    \def\ang{140} % south vertex angle
    \coordinate (S) at (0,0);
    \coordinate (E) at (90-\ang/2:\a);
    \coordinate (N) at (0,\h);
    \coordinate (W) at (90+\ang/2:\a);
    \coordinate (kite) at (0,\h/2);
    \draw[myshape] (S) -- (E) -- (N) -- (W) -- cycle;
    \draw[purple line] (E) -- (N) -- (W);
    \pic[nmarks=1,angcol=myred] {mark angle={(S)-(W)-(N):0.22}};
    \pic[nmarks=1,angcol=myred] {mark angle={(N)-(E)-(S):0.22}};
    \pic[nmarks=2,mypurple] {mark line={(E)-(N):90}};
    \pic[nmarks=2,mypurple] {mark line={(N)-(W):90}};
    \pic[nmarks=1,myblue]   {mark line={(S)-(E):90}};
    \pic[nmarks=1,myblue]   {mark line={(W)-(S):90}};
  \end{scope}

}


%%%%%%%%%%%%%%%%%%%%%%%%%%%%%%
%   COMMON ANGLED TRAPEZIA   %
%%%%%%%%%%%%%%%%%%%%%%%%%%%%%%

\def\commonangtraps{

  % OBTUSE-ANGLED TRAPEZIUM
  \begin{scope}[shift={(-0.5*\W,\yrighttrap*\H)}]
    \node[below=-1,align=center] at (0,0) {
      \contour{white}{obtuse-angled}\\[-0.3em]
      \contour{white}{trapezium}};
    \def\h{1.0} % height
    \def\a{0.9} % length of short horizontal sides
    \def\b{1.7} % length of long horizontal sides
    \coordinate (SW) at (-\b/2,0);
    \coordinate (NW) at (-0.6*\b,\h);
    \coordinate (NE) at (\a-0.6*\b,\h);
    \coordinate (SE) at (\b/2,0);
    \coordinate (obtuse trapezium) at (0,\h/2);
    \draw[myshape] (SW) -- (SE) -- (NE) -- (NW) -- cycle;
    \pic[angcol=mygreen] {mark angle={(SE)-(SW)-(NW):0.20}};
    \pic[angcol=mygreen] {mark angle={(NW)-(NE)-(SE):0.20}};
    \pic[angcol=myred]   {mark angle={(SW)-(NW)-(NE):0.20}};
    \pic[angcol=myred]   {mark angle={(NE)-(SE)-(SW):0.22}};
  \end{scope}

  % ACUTE-ANGLED TRAPEZIUM
  \begin{scope}[shift={(1.5*\W,\yrighttrap*\H)}]
    \node[below=-1,align=center] at (0,0) {
      \contour{white}{acute-angled}\\[-0.3em]
      \contour{white}{trapezium}};
    \def\h{1.0}  % height
    \def\a{0.75} % length of short horizontal sides
    \def\b{1.7}  % length of long horizontal sides
    \coordinate (SW) at (-\b/2,0);
    \coordinate (NW) at (-0.8*\a,\h);
    \coordinate (NE) at ( 0.2*\a,\h);
    \coordinate (SE) at (\b/2,0);
    \coordinate (acute trapezium) at (0,\h/2);
    \draw[myshape] (SW) -- (SE) -- (NE) -- (NW) -- cycle;
    \pic[angcol=mygreen] {mark angle={(SW)-(NW)-(NE):0.20}};
    \pic[angcol=mygreen] {mark angle={(NW)-(NE)-(SE):0.20}};
    \pic[angcol=myred]   {mark angle={(SE)-(SW)-(NW):0.20}};
    \pic[angcol=myred]   {mark angle={(NE)-(SE)-(SW):0.21}};
  \end{scope}

}


%%%%%%%%%%%%%%%%%%%%%%%%%%%%%%%
%   COMMON GENERAL TRAPEZIA   %
%%%%%%%%%%%%%%%%%%%%%%%%%%%%%%%

\def\xirr{-0.8} % x position irregular trapezium
\def\xtrap{0.5} % x position trapezium/trapezoid
\def\ytrap{3.2} % y position trapezia
\def\commonirreg{ % common irregular in each picture
  \message{^^J  Common irregular/trapezium}

  % IRREGULAR / TRAPEZIUM
  % If irregular quadrilateral is defined as having no parallel sides,
  % then some "non-trapezium" kites, cyclic and tangential quadrilaterals are irregular
  \begin{scope}[shift={(\xirr*\W,\ytrap*\H)}]
    \node[below=-1,align=center] at (0,0) {
      \contour{white}{irregular \scriptsize(Brit.)}\\[-0.3em]
      \contour{white}{trapezium \scriptsize(Amer.)}};
    \def\h{1.0} % height
    \def\a{0.8} % length of short horizontal sides
    \def\b{1.7} % length of long horizontal sides
    \coordinate (SW) at (-\b/2,0);
    \coordinate (NW) at (-0.7*\a,0.8*\h);
    \coordinate (NE) at ( 0.3*\a,\h);
    \coordinate (SE) at (\b/2,0);
    \coordinate (irregular) at (0,\h/2);
    \draw[myshape] (SW) -- (SE) -- (NE) -- (NW) -- cycle;
  \end{scope}
}
\def\commontrap{ % common trapezium/trapezoid in each picture
  \message{^^J  Common trapezium/trapezoid}

  % TRAPEZIUM / TRAPEZOID
  \begin{scope}[shift={(\xtrap*\W,\ytrap*\H)}]
    \node[below=-1,align=center] at (0,0) {
      \contour{white}{trapezium \scriptsize(Brit.)}\\[-0.3em]
      \contour{white}{trapezoid \scriptsize(Amer.)}};
    \def\h{1.0}  % height
    \def\a{0.75} % length of short horizontal sides
    \def\b{1.7}  % length of long horizontal sides
    \coordinate (SW) at (-\b/2,0);
    \coordinate (NW) at (-0.8*\a,\h);
    \coordinate (NE) at ( 0.2*\a,\h);
    \coordinate (SE) at (\b/2,0);
    \coordinate (trapezium) at (0,\h/2);
    \draw[myshape] (SW) -- (SE) -- (NE) -- (NW) -- cycle;
  \end{scope}

}


%%%%%%%%%%%%%%%%%%%%%%%%%%%%%%%%%%%%%
%   COMMON GENERAL QUADRILATERALS   %
%%%%%%%%%%%%%%%%%%%%%%%%%%%%%%%%%%%%%

\def\xybicent{-1.32,2.35} % xy position bicentric
\def\ytangent{3.0}        %  y position tangential
\def\xcyclic{1.5}         % x  position cyclic
\def\ycyclic{2.8}         %  y position cyclic
\def\ydart{3.67}          %  y position dart
\def\yconcave{4.2}        %  y position concave
\def\xconvex{0.0}         % x  position convex
\def\yconvex{4.0}         %  y position convex
\def\xysimple{-0.75,4.7}  % xy position simple
\def\xycomplex{0.7,4.7}   % xy position complex
\def\xyquad{0,5.4}        % xy position complex
\def\colcirc{white}       % contour color for tangential/cyclic/bicentric
\def\commonquads{ % common quadrilaterals in each picture
  \message{^^J  Common (general) quadrilateral}

  %%%% LEVEL 3.5 %%%%%%%%%%%%%%%%%%%%%%%%

  % BICENTRIC
  % Construct bicentric quadrilateral for given incircle, circumcircle and one vertex
  % https://tikz.net/quadrilaterals_bicentric/
  % http://dynamicmathematicslearning.com/new-bicentric-construction.html
  \def\r{0.46}   % inradius = radius of incircle
  \def\R{0.68}   % circumradius = radius of circumcircle
  \def\angXi{40} % polar angle of incircle center
  \def\angA{-40} % polar angle of point A
  \pgfmathsetmacro\x{sqrt(\R^2+\r^2-\r*sqrt(4*\R^2+\r^2))} % Fuss's theorem
  \begin{scope}[shift={(\R+\W*\xybicent*\H+\R)}]
    \node[below=-1] at (0.0,0.05-\R) {\contour{\colcirc}{bicentric}};
    \coordinate (Oout) at (0,0);
    \coordinate (Oin) at (\angXi:\x);
    \coordinate (bicentric) at (-60:0.3*\R);
    \coordinate (bicentric-N) at (90:0.3*\R);
    \coordinate (bicentric-W) at (190:0.3*\R);
    \foreach \P [
      remember={\angP as \lastang (initially \angA);},
      evaluate={
        \d=sqrt(\x^2+\R^2-\r^2-2*\x*\R*cos(\angXi-\lastang));
        \D=sqrt(\d^2+\r^2);
        \tanang=90+atan2(\d,\r)+atan2(\R*sin(\lastang)-\x*sin(\angXi),
                                      \R*cos(\lastang)-\x*cos(\angXi));
        \angP=2*\tanang-\lastang-180;
      }] in {NW,NE,SE,SW}{
      \coordinate (\P) at (\angP:\R); % corner
    }
    \coordinate (SW) at (\angA:\R); % overwrite for precision
    \draw[mydarkgreen] (Oout) circle(\R);
    \draw[myshape] (SW) -- (SE) -- (NE) -- (NW) -- cycle;
    \draw[mydarkorange] (Oin) circle(\r-0.01);
    \fill[mydarkorange] (Oin) circle(0.02);
    \fill[mydarkgreen] (Oout) circle(0.02);
  \end{scope}

  %%%% LEVEL 4 %%%%%%%%%%%%%%%%%%%%%%%%%%

  % TANGENTIAL QUADRILATERAL
  % Construct tangential trapezoid from four points of tangency on the incircle
  % https://tikz.net/quadrilaterals_bicentric/
  \def\R{0.5}  % inradius = radius of incircle
  \def\angW{-110} % polar angle of point W
  \begin{scope}[shift={(\xkite*\W,\ytangent*\H+\R)}]
    \node[below=-1] at (0.0,-\R) {\contour{\colcirc}{tangential}};
    \coordinate (O) at (0,0);
    \coordinate (tangential) at (O);
    \foreach \P/\angQ [
      remember={\angQ as \lastang (initially \angW);},
      evaluate={
        \r=\R/cos((\angQ-\lastang)/2);
        \angP=(\angQ+\lastang)/2;
      }] in {W/125,N/52,E/-60,S/\angW}{
      \coordinate (\P) at (\angP:\r); % vertex
    }
    \draw[myshape] (S) -- (W) -- (N) -- (E) -- cycle;
    \draw[mydarkorange] (O) circle(\R-0.01);
    \fill[mydarkorange] (O) circle(0.02);
  \end{scope}

  \commontrap %shift={(0.0*\W,\ytrap*\H)}]

  % CYCLIC QUADRILATERAL
  % Construct cyclic quadrilateral four points on the circumcircle
  % https://tikz.net/quadrilaterals_bicentric/
  \def\R{0.7} % circumradius = radius of circumcircle
  \begin{scope}[shift={(\xcyclic*\W,\ycyclic*\H+\R)}]
    \ifdim \ycyclic pt=2.85 pt % for full version
      \node[below=-1,align=center] at (0,-\R) {
        \contour{\colcirc}{convex}\\[-0.3em]
        \contour{\colcirc}{cyclic}};
      \coordinate (convex cyclic) at (0,0);
      \coordinate (convex cyclic-W) at (0,-0.2*\R);
    \else % for extended versions
      \node[below=-1] at (0.0,-\R) {\contour{\colcirc}{cyclic}};
      \coordinate (cyclic) at (0,0);
      \coordinate (cyclic-W) at (0,-0.2*\R);
    \fi
    \coordinate (O) at (0,0);
    \coordinate (SW) at (215:\R);
    \coordinate (NW) at (120:\R);
    \coordinate (NE) at ( 45:\R);
    \coordinate (SE) at (320:\R);
    \draw[mydarkgreen] (O) circle(\R);
    \draw[myshape] (SW) -- (NW) -- (NE) -- (SE) -- cycle;
    \fill[mydarkgreen] (O) circle(0.02);
  \end{scope}

  % DART
  \begin{scope}[shift={(\xkite*\W,\ydart*\H)}]
    \node[below=-6,align=center] at (0,0) {\contour{white}{dart}};
    %\node[below=-3,align=center] at (0,0) {
    %  \contour{white}{dart}\\[-0.3em]
    %  \contour{white}{(concave) kite}};
    \def\w{1.7} % width
    \def\h{0.6} % height
    \coordinate (E) at (-\w/2,0);
    \coordinate (S) at (0,0.4*\h);
    \coordinate (W) at (\w/2,0);
    \coordinate (N) at (0,\h);
    \coordinate (dart) at (0,0.8*\h);
    %\draw[mydashed] (W) -- (E);
    \draw[myshape] (E) -- (S) -- (W) -- (N) -- cycle;
    \draw[purple line] (E) -- (N) -- (W);
    \pic[nmarks=1,angcol=myred] {mark angle={(S)-(E)-(N):0.32}};
    \pic[nmarks=1,angcol=myred] {mark angle={(N)-(W)-(S):0.32}};
    \pic[nmarks=2,markshift= 0.12,mypurple] {mark line={(E)-(N):90}};
    \pic[nmarks=2,markshift=-0.12,mypurple] {mark line={(N)-(W):90}};
    \pic[nmarks=1,markshift=-0.10,myblue]   {mark line={(S)-(E):90}};
    \pic[nmarks=1,markshift= 0.10,myblue]   {mark line={(W)-(S):90}};
  \end{scope}

  %%%% LEVEL 5 %%%%%%%%%%%%%%%%%%%%%%%%%%

  % CONCAVE
  \begin{scope}[shift={(\xkite*\W,\yconcave*\H)}]
    \node[below=-1,align=center] at (0,0) {\contour{white}{concave}};
    \def\w{1.6} % width
    \def\h{1.0} % height
    \coordinate (concave) at (0,0.35*\h);
    \coordinate (N) at (0.4*\w,\h);
    \coordinate (S) at (\w/2,0);
    \draw[mydashed] (N) -- (S);
    \draw[myshape]
      (-\w/2,0.1*\h) -- (N) --
      (0.25*\w,0.5*\h) -- (S) -- cycle;
  \end{scope}

  % CONVEX
  \begin{scope}[shift={(\xconvex*\W,\yconvex*\H)}]
    \node[below=-1,align=center] at (0,0) {\contour{white}{convex}};
    \def\h{1.0} % height
    \def\w{1.4} % length of short horizontal sides
    \coordinate (convex) at (0,\h/2);
    \draw[myshape]
      (-\w/2,0.2*\h) -- (-0.4*\w,0.9*\h) --
      (0.3*\w,\h) -- (\w/2,0) -- cycle;
  \end{scope}

  %%%% LEVEL 6 %%%%%%%%%%%%%%%%%%%%%%%%%%

  % SIMPLE
  \begin{scope}[shift={(\W*\xysimple*\H)}]
    \node[below=-1,align=center] at (0,0) {\contour{white}{simple}};
    \def\w{1.6} % width
    \def\h{1.0} % height
    \coordinate (simple) at (0,0.35*\h);
    \draw[myshape]
      (-\w/2,0.1*\h) -- (0.4*\w,\h) --
      (0.25*\w,0.5*\h) -- (\w/2,0) -- cycle;
  \end{scope}

  % COMPLEX
  \begin{scope}[shift={(\W*\xycomplex*\H)}]
    \node[below=-1,align=center] at (0,0) {\contour{white}{complex}};
    \def\w{1.6} % width
    \def\h{0.8} % height
    \coordinate (complex-W) at (-0.10*\w,\h/2);
    \coordinate (complex-E) at ( 0.05*\w,\h/2);
    \coordinate (complex) at (0.1*\w,\h/2);
    \draw[myshape]
      (-\w/2,0.1*\h) -- (\w/2,\h) --
      (0.4*\w,0) -- (-0.3*\w,0.9*\h) -- cycle;
  \end{scope}

  %%%% LEVEL 6 %%%%%%%%%%%%%%%%%%%%%%%%%%

  % QUADRILATERAL
  \begin{scope}[shift={(\W*\xyquad*\H)}]
    \node[below=-1,align=center] at (0,0) {
      \contour{white}{quadrilateral}};
    \def\w{1.6} % width
    \def\h{0.8} % height
    \coordinate (quadrilateral) at (0.11*\w,\h/2);
    \coordinate (quadrilateral-W) at (-0.11*\w,\h/2);
    \coordinate (quadrilateral-E) at (0.11*\w,\h/2);
    \draw[myshape]
      (-\w/2,0.1*\h) -- (\w/2,\h) --
      (0.4*\w,0) -- (-0.3*\w,0.9*\h) -- cycle;
  \end{scope}

  %%%%%%%%%%%%%%%%%%%%%%%%%%%%%%%%%%%%%%%

}


%%%%%%%%%%%%%%%%%%%%%%%%%%%%%%%%%%%%%%%%%%%%%%%%%%%
%   QUADRILATERAL HASSE DIAGRAM (trapezia only)   %
%%%%%%%%%%%%%%%%%%%%%%%%%%%%%%%%%%%%%%%%%%%%%%%%%%%

\begin{tikzpicture}
  \message{^^JTrapezia only}

  \def\H{2.2}     % height of each row
  \def\W{2.4}     % width of column
  \def\ytrap{3.0} % y position of general trapezia

  % QUADRILATERALS
  \commontraps
  \commonirreg
  \commontrap
  \node[below=-1,align=center,inner sep=1] (quadrilateral) at (-0.2*\W,3.9*\H)
    {\contour{white}{quadrilateral}};

  % CONNECTIONS
  \begin{pgfonlayer}{back} % draw on back
    \draw[black]
      (square) -- (rhombus) -- (parallelogram) -- (trapezium)
      (square) -- (rectangle) -- (right trapezium) -- (trapezium)
      (square) -- (3 trapezium) -- (2 trapezium)
      (parallelogram) -- (rectangle) -- (2 trapezium) -- (trapezium)
      (irregular) -- (quadrilateral) -- (trapezium);
  \end{pgfonlayer}

\end{tikzpicture}


%%%%%%%%%%%%%%%%%%%%%%%%%%%%%%%%%%%%%%%%%%%%%%%%%%%%%%%%%%%%%%%%%%%%%%%%%
%   QUADRILATERAL HASSE DIAGRAM (trapezia only, incl. obtuse & acute)   %
%%%%%%%%%%%%%%%%%%%%%%%%%%%%%%%%%%%%%%%%%%%%%%%%%%%%%%%%%%%%%%%%%%%%%%%%%

\begin{tikzpicture}
  \message{^^JTrapezia only, incl. obtuse & acute}

  \def\H{2.2}          % height of each row
  \def\W{2.4}          % width of column
  \def\ysquare{0.2}    % y position square
  \def\yrectangle{1.2} % y position rectangle
  \def\yrighttrap{3}   % y position right-angled trapezium
  \def\ytrap{4.0}      % y position of general trapezia
  \def\colpara{white}  % contour color for parallelograms
  \def\coltrap{white}  % contour color for isosceles trapezia

  % QUADRILATERALS
  \commontraps
  \commonangtraps
  \commonirreg
  \commontrap
  \node[below=-1,align=center,inner sep=1] (quadrilateral) at (-0.2*\W,4.9*\H)
    {\contour{white}{quadrilateral}};

  % CONNECTIONS
  \begin{pgfonlayer}{back} % draw on back
    \draw[black]
      (square) -- (rhombus) -- (parallelogram) -- (obtuse trapezium) -- (trapezium)
      (square) -- (rectangle) -- (right trapezium) -- (trapezium)
      (square) -- (3 trapezium) -- (2 trapezium)
      (parallelogram) -- (rectangle) -- (2 trapezium) -- (acute trapezium) -- (trapezium)
      (irregular) -- (quadrilateral) -- (trapezium);
  \end{pgfonlayer}

\end{tikzpicture}


%%%%%%%%%%%%%%%%%%%%%%%%%%%%%%%%%%%%%%%%%%%%%%%%%%%%%%%%%%%%%%%%%%%%%%%%%%
%%   QUADRILATERAL HASSE DIAGRAM (trapezia only, incl. obtuse & acute)   %
%%%%%%%%%%%%%%%%%%%%%%%%%%%%%%%%%%%%%%%%%%%%%%%%%%%%%%%%%%%%%%%%%%%%%%%%%%
%
%\begin{tikzpicture}
%  \message{^^JTrapezia only, incl. obtuse & acute with grouping}
%
%  \def\H{2.2}          % height of each row
%  \def\W{2.4}          % width of column
%  \def\ysquare{0.2}    % y position square
%  \def\yrectangle{1.2} % y position rectangle
%  \def\yrighttrap{3}   % y position right-angled trapezium
%  \def\ytrap{4.0}      % y position of general trapezia
%  \def\colpara{mydarkgreen!3} % contour color for parallelograms
%  \def\coltrap{mydarkred!3}   % contour color for isosceles trapezia
%
%  % QUADRILATERALS
%  \commontraps
%  \commonangtraps
%  \commonirreg
%  \commontrap
%  \node[below=-1,align=center,inner sep=1] (quadrilateral) at (-0.2*\W,4.9*\H)
%    {\contour{white}{quadrilateral}};
%
%  % CONNECTIONS
%  \begin{pgfonlayer}{back} % draw on back
%    \draw[mygreenset] (parallelogram) -- (obtuse trapezium);
%    \draw[mygreenset] (parallelogram)++(-1.2,0.7) rectangle++ (2.4,-1.8*\H);
%    \draw[myset] (2 trapezium) -- (acute trapezium);
%    \draw[myset] (2 trapezium)++(-1.2,0.7) rectangle++ (2.4,-1.95*\H);
%    \draw[black]
%      (square) -- (rhombus) -- (parallelogram) %--
%      (obtuse trapezium) -- (trapezium)
%      (square) -- (rectangle) -- (right trapezium) -- (trapezium)
%      (square) -- (3 trapezium) -- (2 trapezium)
%      (parallelogram) -- (rectangle) -- (2 trapezium) %--
%      (acute trapezium) -- (trapezium)
%      (irregular) -- (quadrilateral) -- (trapezium);
%  \end{pgfonlayer}
%
%\end{tikzpicture}


%%%%%%%%%%%%%%%%%%%%%%%%%%%%%%%%%%%%%%%%%%%%%%%%%
%   QUADRILATERAL HASSE DIAGRAM (incl. kites)   %
%%%%%%%%%%%%%%%%%%%%%%%%%%%%%%%%%%%%%%%%%%%%%%%%%

\begin{tikzpicture}
  \message{^^JTrapezia only, incl. kites}

  \def\H{2.5}     % height of each row
  \def\W{2.5}     % width of column
  \def\xsquare{0} % x position square
  \def\ytrap{3.0} % y position trapezia

  % QUADRILATERALS
  \commontraps
  \commonkites
  \commontrap

  % CONNECTIONS
  \begin{pgfonlayer}{back} % draw on back
    \draw[black]
      (square) -- (right kite) -- (kite)
      (square) -- (rhombus) -- (parallelogram) -- (trapezium)
      (square) -- (rectangle) -- (right trapezium) -- (trapezium)
      (square) -- (3 trapezium) -- (2 trapezium)
      (kite) -- (rhombus)
      (parallelogram) -- (rectangle) -- (2 trapezium) -- (trapezium);
  \end{pgfonlayer}

\end{tikzpicture}


%%%%%%%%%%%%%%%%%%%%%%%%%%%%%%%%%%%%%%%%%%%%%%%%%%%%%%%%
%%   QUADRILATERAL HASSE DIAGRAM (incl. kites, irr.)   %
%%%%%%%%%%%%%%%%%%%%%%%%%%%%%%%%%%%%%%%%%%%%%%%%%%%%%%%%
%
%\begin{tikzpicture}
%  \message{^^JTrapezia only, incl. kites & irregular}
%
%  \def\H{2.5}     % height of each row
%  \def\W{2.5}     % width of column
%  \def\xsquare{0} % x position square
%  \def\ytrap{3.2} % y position of general trapezia
%  \def\colkite{mydarkred!3} % contour color for kites
%
%  % QUADRILATERALS
%  \commontraps
%  \commonkites
%  \commonirreg
%  \commontrap
%  \node[below=-1,align=center,inner sep=1] (quadrilateral) at (-0.2*\W,\ytrap*\H+0.8*\H)
%    {\contour{white}{quadrilateral}};
%
%  % CONNECTIONS
%  \begin{pgfonlayer}{back} % draw on back
%    \draw[myset] (kite) -- (irregular);
%    \draw[myset] (kite)++(-0.95,0.8) rectangle++ (1.9,-1.78*\H);
%    \draw[black]
%      (square) -- (right kite) -- (kite)
%      (square) -- (rhombus) -- (parallelogram) -- (trapezium)
%      (square) -- (rectangle) -- (right trapezium) -- (trapezium)
%      (square) -- (3 trapezium) -- (2 trapezium)
%      (kite) -- (rhombus)
%      (parallelogram) -- (rectangle) -- (2 trapezium) -- (trapezium)
%      (irregular) -- (quadrilateral) -- (trapezium);
%  \end{pgfonlayer}
%
%\end{tikzpicture}
%
%
%
%%%%%%%%%%%%%%%%%%%%%%%%%%%%%%%%%%%%%%%%%%%%%%%%%%%%%%%%%%%%%%%%%%%%%%%%%%%%%%%
%%   QUADRILATERAL HASSE DIAGRAM (trapezia only, incl. kites, obtuse acute)   %
%%%%%%%%%%%%%%%%%%%%%%%%%%%%%%%%%%%%%%%%%%%%%%%%%%%%%%%%%%%%%%%%%%%%%%%%%%%%%%%
%
%\begin{tikzpicture}
%  \message{^^JTrapezia only, incl. kites, obtuse & acute}
%
%  \def\H{2.2}          % height of each row
%  \def\W{2.4}          % width of column
%  \def\xsquare{-0.1}   % x position square
%  \def\ysquare{0.0}    % y position square
%  \def\yrectangle{1.0} % y position rectangle
%  \def\xkite{-1.7}     % x position of kites
%  \def\yrighttrap{3}   % y position right-angled trapezium
%  \def\ytrap{4.0}      % y position of general trapezia
%  \def\xirr{-1.7}      % x position irregular trapezium
%  \def\colpara{mydarkgreen!3}  % contour color for parallelograms
%  \def\coltrap{mydarkred!3}    % contour color for isosceles trapezia
%  \def\colkite{mydarkorange!3} % contour color for kites
%
%  % QUADRILATERALS
%  \commontraps
%  \commonkites
%  \commonangtraps
%  \commonirreg
%  \commontrap
%  \node[below=-1,align=center,inner sep=1] (quadrilateral) at (-0.7*\W,4.9*\H)
%    {\contour{white}{quadrilateral}};
%
%  % CONNECTIONS
%  \begin{pgfonlayer}{back} % draw on back
%    \draw[myorangeset] (kite) -- (irregular);
%    \draw[myorangeset] (kite)++(-0.95,0.7) rectangle++ (1.9,-1.85*\H);
%    \draw[mygreenset] (parallelogram) -- (obtuse trapezium);
%    \draw[mygreenset] (parallelogram)++(-1.2,0.7) rectangle++ (2.4,-1.8*\H);
%    \draw[myset] (2 trapezium) -- (acute trapezium);
%    \draw[myset] (2 trapezium)++(-1.2,0.7) rectangle++ (2.4,-1.95*\H);
%    \draw[black]
%      (square) -- ($(right kite)-(0,0.2)$) -- (kite)
%      (square) -- (rhombus) -- (parallelogram) %--
%      (obtuse trapezium) -- (trapezium)
%      (square) -- (rectangle) -- (right trapezium) -- (trapezium)
%      (square) -- (3 trapezium) -- (2 trapezium)
%      (kite) -- (rhombus)
%      (parallelogram) -- (rectangle) -- (2 trapezium) %--
%      (acute trapezium) -- (trapezium)
%      (irregular) -- (quadrilateral) -- (trapezium);
%  \end{pgfonlayer}
%
%\end{tikzpicture}


%%%%%%%%%%%%%%%%%%%%%%%%%%%%%%%%%%%%%%%%%%
%   QUADRILATERAL HASSE DIAGRAM (full)   %
%%%%%%%%%%%%%%%%%%%%%%%%%%%%%%%%%%%%%%%%%%
% Inspiration:
%   https://en.wikipedia.org/wiki/Quadrilateral#Taxonomy
%   https://commons.wikimedia.org/wiki/File:Quadrilateral_hierarchy_svg.svg

\begin{tikzpicture}
  \message{^^JFull Hasse diagram}

  \def\H{2.5}             % height of each row
  \def\W{2.6}             % width of column
  \def\xsquare{0}         % x position square
  \def\xkite{-1.6}        % x position kites
  \def\xtrap{0.0}         % x position trapezia
  \def\ytrap{3.2}         % y position trapezia
  \def\ycyclic{2.75}      % y position cyclic
  \def\xycomplex{1.0,4.7} % xy position complex
  \def\xyquad{0.2,5.3}    % xy position complex

  % QUADRILATERALS
  \commontraps
  \commonkites
  \commonquads

  % CONNECTIONS
  \begin{pgfonlayer}{back} % draw on back
    \draw[black]
      (square) -- (right kite) -- (kite) -- (tangential)
      (square) -- (rhombus) -- (parallelogram) -- (trapezium)
      (square) -- (rectangle) -- (right trapezium) -- (trapezium)
      (square) -- (3 trapezium) -- (2 trapezium) -- (cyclic)
      (parallelogram) -- (rectangle) -- (2 trapezium) -- (trapezium)
      (rhombus) -- (kite)
      (tangential) -- (convex) -- (simple) -- (concave) -- (dart)
      (trapezium) -- (convex) -- (cyclic)
      (simple) -- (quadrilateral-W)
      (complex-W) -- (quadrilateral-E);
    \draw[frontline]
      (cyclic) -- (bicentric)
      (right kite) -- (bicentric) -- (tangential);
    \draw[blue!20!black!50,dashed]
      (dart) to[out=-145,in=135,looseness=1.3] ($(kite)-(0,0.2)$);
  \end{pgfonlayer}

\end{tikzpicture}


%%%%%%%%%%%%%%%%%%%%%%%%%%%%%%%%%%%%%%%%%%%%%%%%%%%%%%%%%%%%%%%%
%   QUADRILATERAL HASSE DIAGRAM (full, incl. obtuse & acute)   %
%%%%%%%%%%%%%%%%%%%%%%%%%%%%%%%%%%%%%%%%%%%%%%%%%%%%%%%%%%%%%%%%
% Inspiration:
%   https://en.wikipedia.org/wiki/Quadrilateral#Taxonomy
%   https://commons.wikimedia.org/wiki/File:Quadrilateral_hierarchy_svg.svg

\begin{tikzpicture}
  \message{^^JFull Hasse diagram, incl. obtuse & acute}

  \def\H{2.4}             % height of each row
  \def\W{2.6}             % width of column
  \def\xsquare{0.5}       % x  position square
  \def\xkite{-2.4}        % x  position kites
  \def\ykite{2.0}         %  y position kite
  \def\yrighttrap{2.9}    %  y position right-angled trapezium
  \def\xybicent{-1.8,1.1} % xy position bicentric
  \def\ytangent{2.1}      %  y position tangential
  \def\xirr{-1.5}         % x  position irregular trapezium
  \def\ytrap{3.15}        %  y position trapezium
  \def\ydart{3.4}         %  y position dart
  \def\xcyclic{-1.5}      % x  position cyclic
  \def\ycyclic{2.0}       %  y position cyclic
  \def\yconcave{4.0}      %  y position concave
  \def\xconvex{-0.6}      % x  position convex
  \def\yconvex{4.0}       %  y position convex
  \def\xysimple{-1.5,4.6} % xy position simple
  \def\xycomplex{0.9,4.6} % xy position complex
  \def\xyquad{-0.3,5.3}   % xy position complex
  \def\colpara{mydarkgreen!3}  % contour color for parallelograms
  \def\coltrap{mydarkred!3}    % contour color for isosceles trapezia
  \def\colkite{mydarkorange!3} % contour color for kites
  \def\colcirc{mydarkorange!3} % contour color for tangential/cyclic/bicentric

  % QUADRILATERALS
  \commontraps
  \commonkites
  \commonangtraps
  \begin{scope}[shift={(0,0.8*\H)}]
    \commonirreg
    \commonquads
  \end{scope}

  % CONNECTIONS
  \begin{pgfonlayer}{back} % draw on back
    \draw[myorangeset] (kite) -- (irregular);
    \draw[myorangeset]
      (tangential)++(-1.25,0.8) rectangle++ (1.7*\W,-2.7*\H);
    \draw[mygreenset] (parallelogram) -- (obtuse trapezium);
    \draw[mygreenset] (parallelogram)++(-1.2,0.7) rectangle++ (2.4,-1.7*\H);
    \draw[myset] (2 trapezium) -- (acute trapezium);
    \draw[myset] (2 trapezium)++(-1.2,0.7) rectangle++ (2.4,-1.85*\H);
    \draw[black]
      (square) -- (right kite) -- (kite) -- (tangential)
      (square) -- (rhombus) -- (parallelogram)
      (obtuse trapezium) -- (trapezium) -- (acute trapezium)
      (square) -- (rectangle) -- (right trapezium) -- (trapezium)
      (square) -- (3 trapezium) -- (2 trapezium)
      (parallelogram) -- (rectangle) -- (2 trapezium)
      (rhombus) -- (kite)
      (irregular) -- (convex) -- (simple) -- (concave) -- (dart)
      (trapezium) -- (convex)
      (simple) -- (quadrilateral-W)
      (complex-W) -- (quadrilateral-E);
    \draw[frontline]
      (2 trapezium) -- (cyclic-W);
    \draw[frontline,mydarkorange!3]
      (cyclic) -- (bicentric)
      (tangential) -- (bicentric-N)
      (right kite) -- (bicentric-W);
    \draw[dashed,blue!20!black!50]
      (dart) to[out=-135,in=140,looseness=1.2] ($(kite)-(0,0.5)$);
  \end{pgfonlayer}

\end{tikzpicture}


%%%%%%%%%%%%%%%%%%%%%%%%%%%%%%%%%%%%%%%%%%%%%%
%   QUADRILATERAL HASSE DIAGRAM (extended)   %
%%%%%%%%%%%%%%%%%%%%%%%%%%%%%%%%%%%%%%%%%%%%%%
% https://en.wikipedia.org/wiki/Quadrilateral#Complex_quadrilaterals

\begin{tikzpicture}
  \message{^^JExtended Hasse diagram}

  \def\H{2.5}             % height of each row
  \def\W{2.5}             % width of column
  \def\xsquare{0}         % x position square
  \def\xkite{-1.6}        % shift kite column
  \def\xcyclic{1.5}       % x position cyclic
  \def\ycyclic{2.85}      %  y position cyclic
  \def\ydart{3.67}        %  y position dart
  \def\xtrap{0.0}         %  y position trapezia
  \def\ytrap{3.2}         %  y position trapezia
  \def\yconcave{4.2}      %  y position concave
  \def\yconvex{4.0}       %  y position convex
  \def\xysimple{0.0,4.8}  % xy position simple
  \def\xycomplex{3.5,4.8} % xy position complex
  \def\xyquad{1.9,5.5}    % xy position complex

  %%%% LEVEL 1 %%%%%%%%%%%%%%%%%%%%%%%%%%

  \commontraps
  \commonkites

  % CROSSED SQUARE
  \begin{scope}[shift={(3.1*\W,0)}]
    \node[below=-1,align=center] at (0,0) {
      \contour{white}{crossed square}};
    \def\a{1.0} % length of each side
    \coordinate (O)  at (0,\a/2);
    \coordinate (SW) at (-\a/2, 0);
    \coordinate (NW) at (-\a/2,\a);
    \coordinate (NE) at ( \a/2,\a);
    \coordinate (SE) at ( \a/2, 0);
    \coordinate (crossed square) at (O);
    \draw[mydashed] (SW) -- (SE) (NW) -- (NE);
    \draw[myshape] (SW) -- (NE) -- (SE) -- (NW) -- cycle;
    \draw[purple line] (SW) -- (NW) (SE) -- (NE);
    \pic[nmarks=1,angcol=myred] {mark angle={(SW)-(NW)-(O):0.20}};
    \pic[nmarks=1,angcol=myred] {mark angle={(O)-(NE)-(SE):0.20}};
    \pic[nmarks=1,angcol=myred] {mark angle={(O)-(SW)-(NW):0.20}};
    \pic[nmarks=1,angcol=myred] {mark angle={(NE)-(SE)-(O):0.20}};
    \pic[angcol=myblue] {right angle={(NW)-(O)-(SW):0.20}};
    \pic[angcol=myblue] {right angle={(SE)-(O)-(NE):0.20}};
    \pic[nmarks=1,markshift=0.08,myblue] {mark line={(NW)-(SE):90}};
    \pic[nmarks=1,markshift=0.08,myblue] {mark line={(SW)-(NE):90}};
    \pic[nmarks=2,mypurple] {mark line={(NW)-(SW):90}};
    \pic[nmarks=2,mypurple] {mark line={(NE)-(SE):90}};
  \end{scope}

  %%%% LEVEL 2 %%%%%%%%%%%%%%%%%%%%%%%%%%

  % CROSSED RHOMBUS
  \def\a{1.0} % length of each sides
  \def\ang{60} % smaller vertex angle (SW)
  \pgfmathsetmacro\h{\a*sqrt(2-2*cos(\ang))} % height / diagonal
  \begin{scope}[shift={(2.6*\W,\H)}]
    \node[below=-1,align=center] at (0,0) {
      \contour{white}{crossed}\\[-0.3em]
      \contour{white}{rhombus}};
    \coordinate (O)  at ({0.1*\a*cos(\ang)},{\a*sin(\ang)/2});
    \coordinate (SW) at ({-\a/2-0.4*\a*cos(\ang)},0);
    \coordinate (SE) at ($(SW)+(\a,0)$);
    \coordinate (NW) at ($(SW)+(\ang:\a)$);
    \coordinate (NE) at ($(SE)+(\ang:\a)$);
    \coordinate (crossed rhombus) at (0.2*\a,{\a*sin(\ang)/2});
    \draw[mydashed] (SW) -- (SE) (NW) -- (NE);
    \draw[myshape] (SW) -- (NW) -- (SE) -- (NE) -- cycle;
    \draw[purple line] (SW) -- (NW) (SE) -- (NE);
    \pic[nmarks=2,angcol=mygreen] {mark angle={(SW)-(NW)-(O):0.20}};
    \pic[nmarks=2,angcol=mygreen] {mark angle={(NE)-(SE)-(O):0.20}};
    \pic[nmarks=1,angcol=myred]   {mark angle={(O)-(SW)-(NW):0.23}};
    \pic[nmarks=1,angcol=myred]   {mark angle={(O)-(NE)-(SE):0.23}};
    \pic[nmarks=1,markshift=0.08,myblue] {mark line={(NW)-(SE):90}};
    \pic[nmarks=1,markshift=0.08,myblue] {mark line={(SW)-(NE):90}};
    \pic[nmarks=1,myblue] {mark line={(NW)-(SW):90}};
    \pic[nmarks=1,myblue] {mark line={(NE)-(SE):90}};
  \end{scope}

  % CROSSED RECTANGLE
  \begin{scope}[shift={(3.6*\W,\H)}]
    \node[below=-1,align=center] at (0,0) {
      \contour{white}{crossed}\\[-0.3em]
      \contour{white}{rectangle}};
    \def\a{1.0} % length of short sides
    \def\b{1.6} % length of long sides
    \coordinate (O)  at (0,\a/2);
    \coordinate (SW) at (-\b/2, 0);
    \coordinate (NW) at (-\b/2,\a);
    \coordinate (NE) at ( \b/2,\a);
    \coordinate (SE) at ( \b/2, 0);
    \coordinate (crossed rectangle) at (O);
    \draw[mydashed] (SW) -- (SE) (NW) -- (NE);
    \draw[myshape] (SW) -- (NE) -- (SE) -- (NW) -- cycle;
    \draw[purple line] (SW) -- (NW) (SE) -- (NE);
    \pic[nmarks=1,angcol=myred] {mark angle={(SW)-(NW)-(O):0.20}};
    \pic[nmarks=1,angcol=myred] {mark angle={(O)-(NE)-(SE):0.20}};
    \pic[nmarks=1,angcol=myred] {mark angle={(O)-(SW)-(NW):0.20}};
    \pic[nmarks=1,angcol=myred] {mark angle={(NE)-(SE)-(O):0.20}};
    %\pic[nmarks=2,angcol=mygreen] {mark angle={(SE)-(O)-(NE):0.20}};
    %\pic[nmarks=2,angcol=mygreen] {mark angle={(NW)-(O)-(SW):0.20}};
    \pic[nmarks=1,markshift=0.08,myblue] {mark line={(NW)-(SE):90}};
    \pic[nmarks=1,markshift=0.08,myblue] {mark line={(SW)-(NE):90}};
    \pic[nmarks=2,mypurple] {mark line={(NW)-(SW):90}};
    \pic[nmarks=2,mypurple] {mark line={(NE)-(SE):90}};
  \end{scope}

  %%%% LEVEL 3 %%%%%%%%%%%%%%%%%%%%%%%%%%

  % "CROSSED PARALLELOGRAM" ?
  \begin{scope}[shift={(2.6*\W,2*\H)}]
    \node[below=-1,align=center,opacity=0.3] at (0,0) {
      \contour{white}{crossed}\\[-0.3em]
      \contour{white}{parallelogram}};
    \def\a{1.0}  % length short sides
    \def\b{1.4}  % length long sides
    \def\ang{60} % smaller vertex angle (SW)
    \coordinate (O)  at ({0.1*\a*cos(\ang)},{\a*sin(\ang)/2});
    \coordinate (SW) at ({-\b/2-0.4*\a*cos(\ang)},0);
    \coordinate (SE) at ($(SW)+(\b,0)$);
    \coordinate (NW) at ($(SW)+(\ang:\a)$);
    \coordinate (NE) at ($(SE)+(\ang:\a)$);
    \coordinate (crossed parallelogram) at (0.2*\a,{\a*sin(\ang)/2});
    \draw[mydashed] (SW) -- (SE) (NW) -- (NE);
    \draw[myshape] (SW) -- (NW) -- (SE) -- (NE) -- cycle;
    \draw[purple line] (SW) -- (NW) (SE) -- (NE);
    \pic[nmarks=2,angcol=mygreen] {mark angle={(SW)-(NW)-(O):0.20}};
    \pic[nmarks=2,angcol=mygreen] {mark angle={(NE)-(SE)-(O):0.20}};
    \pic[nmarks=1,angcol=myred]   {mark angle={(O)-(SW)-(NW):0.23}};
    \pic[nmarks=1,angcol=myred]   {mark angle={(O)-(NE)-(SE):0.23}};
    \pic[nmarks=1,mypurple] {mark line={(NW)-(SW):90}};
    \pic[nmarks=1,mypurple] {mark line={(NE)-(SE):90}};
  \end{scope}

  % CROSSED ISOSCELES TRAPEZIUM
  % https://en.wikipedia.org/wiki/Isosceles_trapezoid#Self-intersections
  \begin{scope}[shift={(3.6*\W,2*\H)}]
    \node[below=-1,align=center] at (0,0) {
      \contour{white}{crossed}\\[-0.3em]
      \contour{white}{isosceles}\\[-0.3em]
      \contour{white}{trapezium}};
    \def\h{1.0} % height
    \def\a{0.9} % length of short horizontal sides
    \def\b{1.7} % length of long horizontal sides
    \coordinate (O)  at (0,{\b*\h/(\a+\b)});
    \coordinate (SW) at (-\b/2,0);
    \coordinate (NW) at (-\a/2,\h);
    \coordinate (NE) at ( \a/2,\h);
    \coordinate (SE) at ( \b/2,0);
    \coordinate (crossed 2 trapezium) at (0,0.8*\h);
    \draw[mydashed] (SW) -- (NW) (SE) -- (NE);
    \draw[myshape] (SW) -- (SE) -- (NW) -- (NE) -- cycle;
    \draw[purple line] (SW) -- (NE) (SE) -- (NW);
    \pic[nmarks=2,angcol=mygreen] {mark angle={(SE)-(SW)-(O):0.24}};
    \pic[nmarks=2,angcol=mygreen] {mark angle={(O)-(SE)-(SW):0.24}};
    \pic[nmarks=1,angcol=myred]   {mark angle={(NW)-(NE)-(O):0.23}};
    \pic[nmarks=1,angcol=myred]   {mark angle={(O)-(NW)-(NE):0.23}};
    \pic[nmarks=1,markshift=0.06,mypurple] {mark line={(SE)-(NW):90}};
    \pic[nmarks=1,markshift=0.06,mypurple] {mark line={(SW)-(NE):90}};
  \end{scope}

  % ANTIPARALLELOGRAM
  % https://en.wikipedia.org/wiki/Antiparallelogram
  \begin{scope}[shift={(4.6*\W,2*\H)}]
    \node[below=-1,align=center] at (0,0) {
      \contour{white}{antiparallelogram}};
    \def\h{1.0} % height
    \def\a{0.9} % length of short horizontal sides
    \def\b{1.7} % length of long horizontal sides
    \coordinate (O)  at (0,{\b*\h/(\a+\b)});
    \coordinate (SW) at (-\b/2,0);
    \coordinate (NW) at (-\a/2,\h);
    \coordinate (NE) at ( \a/2,\h);
    \coordinate (SE) at ( \b/2,0);
    \coordinate (antiparallelogram) at (-0.1*\a,{\b*\h/(\a+\b)});
    \draw[mydashed] (SW) -- (SE) (NW) -- (NE);
    \draw[myshape] (SW) -- (NW) -- (SE) -- (NE) -- cycle;
    \draw[purple line] (SW) -- (NW) (SE) -- (NE);
    \pic[nmarks=2,angcol=mygreen] {mark angle={(SW)-(NW)-(O):0.20}};
    \pic[nmarks=2,angcol=mygreen] {mark angle={(O)-(NE)-(SE):0.20}};
    \pic[nmarks=1,angcol=myred]   {mark angle={(NE)-(SE)-(O):0.23}};
    \pic[nmarks=1,angcol=myred]   {mark angle={(O)-(SW)-(NW):0.23}};
    \pic[nmarks=1,markshift=0.06,myblue] {mark line={(SE)-(NW):90}};
    \pic[nmarks=1,markshift=0.06,myblue] {mark line={(SW)-(NE):90}};
    \pic[nmarks=2,mypurple] {mark line={(NW)-(SW):90}};
    \pic[nmarks=2,mypurple] {mark line={(NE)-(SE):90}};
  \end{scope}

  %%%% LEVEL 3.5-7 %%%%%%%%%%%%%%%%%%%%%%

  \commonquads

  %%%% LEVEL 4 %%%%%%%%%%%%%%%%%%%%%%%%%%

  % CROSSED TRAPEZIUM
  \begin{scope}[shift={(3.0*\W,3*\H)}]
    \node[below=-1,align=center] at (0,0) {
      \contour{white}{crossed}\\[-0.3em]
      \contour{white}{trapezium}\\[-0.3em]
      \contour{white}{\scriptsize(Brit.)}};
    \def\h{1.0}  % height
    \def\a{0.75} % length of short horizontal sides
    \def\b{1.7}  % length of long horizontal sides
    \coordinate (SW) at (-\b/2,0);
    \coordinate (NW) at (-0.8*\a,\h);
    \coordinate (NE) at ( 0.2*\a,\h);
    \coordinate (SE) at (\b/2,0);
    \coordinate (crossed trapezium) at (-0.13*\a,0.66*\h);
    \draw[mydashed] (NW) -- (SW) (NE) -- (SE);
    \draw[myshape] (SW) -- (SE) -- (NW) -- (NE) -- cycle;
  \end{scope}

  % CONCAVE CYCLIC QUADRILATERAL
  % Construct cyclic quadrilateral four points on the circumcircle
  \def\R{0.7} % circumradius = radius of circumcircle
  \begin{scope}[shift={(4.0*\W,3*\H+\R-0.1)}]
    \node[below=-1,align=center] at (0,-\R) {
      \contour{white}{concave}\\[-0.3em]
      \contour{white}{cyclic}};
    \coordinate (O) at (0,0);
    \coordinate (SW) at (210:\R);
    \coordinate (NW) at (120:\R);
    \coordinate (NE) at ( 40:\R);
    \coordinate (SE) at (325:\R);
    \coordinate (concave cyclic) at (60:0.2*\R);
    \draw[mydarkgreen] (O) circle(\R);
    \draw[myshape] (SW) -- (NE) -- (NW) -- (SE) -- cycle;
    \fill[mydarkgreen] (O) circle(0.02);
  \end{scope}

  %%%% LEVEL 5 %%%%%%%%%%%%%%%%%%%%%%%%%%

  % CYCLIC QUADRILATERAL
  % Construct cyclic quadrilateral four points on the circumcircle
  \def\R{0.7} % circumradius = radius of circumcircle
  \begin{scope}[shift={(2.2*\W,4.0*\H+\R)}]
    \node[below=-1,align=center] at (0,-\R) {\contour{white}{cyclic}};
    \coordinate (O) at (0,0);
    \coordinate (SW) at (215:\R);
    \coordinate (NW) at (120:\R);
    \coordinate (NE) at ( 45:\R);
    \coordinate (SE) at (320:\R);
    \coordinate (cyclic) at (O);
    \draw[mydarkgreen] (O) circle(\R);
    \draw[myshape] (SW) -- (NW) -- (NE) -- (SE) -- cycle;
    \fill[mydarkgreen] (O) circle(0.02);
  \end{scope}

  %%%%%%%%%%%%%%%%%%%%%%%%%%%%%%%%%%%%%%%

  % CONNECTIONS
  \begin{pgfonlayer}{back} % draw on back
    \draw[black] % simple quadrilaterals
      (square) -- (right kite) -- (kite) -- (tangential)
      (square) -- (rhombus) -- (parallelogram) -- (trapezium)
      (square) -- (rectangle) -- (right trapezium) -- (trapezium)
      (square) -- (3 trapezium) -- (2 trapezium) -- (convex cyclic)
      (parallelogram) -- (rectangle) -- (2 trapezium) -- (trapezium)
      (rhombus) -- (kite)
      (tangential) -- (convex) -- (simple) -- (concave) -- (dart)
      (trapezium) -- (convex) -- (convex cyclic)
      (quadrilateral-W) -- (simple)
      (quadrilateral-E) -- (complex-W);
    \draw[black] % cyclic
      (convex cyclic) -- (cyclic) -- (quadrilateral);
    \draw[black] % complex quadrilaterals
      (crossed square) -- (crossed rhombus) -- (crossed parallelogram)
      -- (crossed trapezium) -- (complex-W)
      (crossed square) -- (crossed rectangle) -- (crossed 2 trapezium)
      -- (crossed trapezium)
      (crossed rectangle) -- (crossed parallelogram)
      (crossed rectangle) -- (antiparallelogram) -- (concave cyclic)
      (crossed 2 trapezium) -- (concave cyclic) -- (complex-E);
    \draw[frontline]
      (convex cyclic-W) -- (bicentric) -- (right kite)
      (bicentric-N) -- (tangential)
      (cyclic) -- (concave cyclic);
    \draw[blue!20!black!50,dashed]
      (dart) to[out=-145,in=135,looseness=1.3] ($(kite)-(0,0.2)$);
  \end{pgfonlayer}

\end{tikzpicture}


\end{document}
Click to download: quadrilaterals.tex • quadrilaterals.pdf
Open in Overleaf: quadrilaterals.tex


every rhombus is also considered to be a parallelogram!
So I think one link is missing
Hi Maxime,
Thank you for the comment. Where would it be missing? There is a line linking the rhombus and parallellogram in each picture implying that a rhombus is a parallelogram. Maybe you meant “kite” instead of parallellogram? Namely, I see there is one picture missing a line which I will fix now.
Cheers,
Izaak
My knowledge of TikZ is *very* limited, so I’d love a comment about how to add “parallel marks” to lines these beautiful figures. You know, the little arrow head(s) we place on sides to indicate that they are parallel. That would be really nice, especially on the image of the trapezoid.
Hi Jordan,
It is not too hard if you use
decorations.markings. In the preamble:\usetikzlibrary{arrows} % for \arrow \usetikzlibrary{arrows.meta} % to control arrow tip size \usetikzlibrary {decorations.markings} \tikzstyle{paramark}=[blue,postaction={decorate},decoration={markings, mark=at position .5 with {\arrow[line width=0.5]{angle 90[length=5,width=3]}}}]In the main code, it may be cleanest to add them after drawing the shape itself using
\pathto hide the straight line between the two coordinates:\draw[myshape] (SW) -- (SE) -- (NE) -- (NW) -- cycle; \path[paramark] (SW) -- (SE); \path[paramark] (NW) -- (NE);For double arrows, you could use something like
\tikzstyle{paramark2}=[red,postaction={decorate},decoration={markings,
      mark=at position .5*\pgfdecoratedpathlength-1pt with {\arrow[line width=0.5]{angle 90[length=5,width=3]}},
      mark=at position .5*\pgfdecoratedpathlength+1pt with {\arrow[line width=0.5]{angle 90[length=5,width=3]}}}]
In some case you may need to tweak the position of the arrow heads, so you could introduce an optional argument:
\tikzset{
  paramark/.style={
    blue,postaction={decorate},decoration={markings,
    mark=at position #1 with {\arrow[line width=0.5]{angle 90[length=5,width=3]}}}
  },
  paramark/.default={0.5},
}
% ...
    \path[paramark=0.45] (SW) -- (SE);
    \path[paramark] (NW) -- (NE);
Hope that helps?
Izaak
Very pleasant ,I am going to be print a mathematics book to high school ,so it might be help me ,if you are volunteer you may evaluate my book send me your email address through my email adress ,i may send the paper about 50 page you may evaluate it .
sultan kemal Addis ababa .Ethiopia